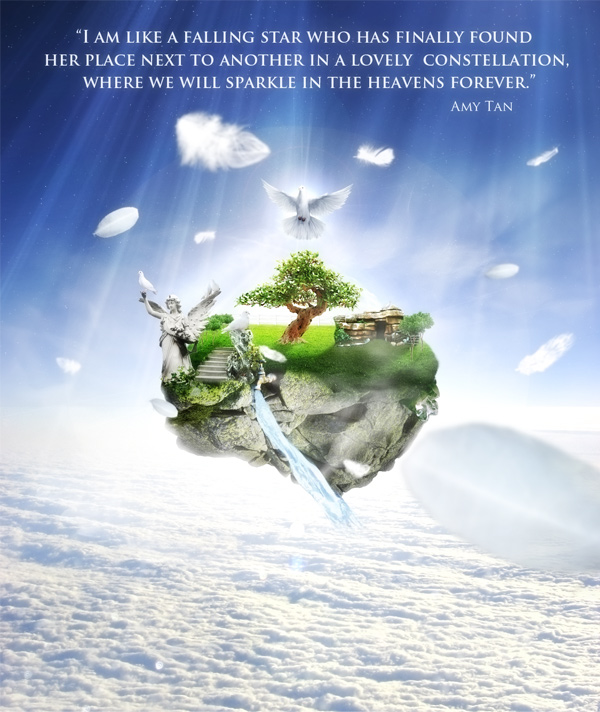
In this tutorial I am going to show you how to create a piece of Heaven in Photoshop. This photo manipulation is inspired by the Metuzalem website and I would like to thank Tajana for allowing me to write this tutorial. I’m very grateful to her.
Also, I would like to thank all the photographers and artists for their wonderful stock images and for the permission to use them. This tutorial would never be possible without they: resurgere, SimplyBackgrounds, ro-stock, nighthawk663, Disney-Stock, WammyP, indeed-stock, Enchantedgal-Stock, redheadstock, Tasastock, Momotte2stocks, Kristina Mileva, Jan Flaska, Marina García, Claudia Meyer, Martin Hurry, Hilde Vanstraelen, clix, Sheila and magstefan.
All the images from deviantArt have specific rules and everyone who is planning to use them on anymore than just following the tutorial should read those rules and ask the photographer’s permission to use them.
Final Result
This is a Piece of Heaven we are about to make. You can see the final result bellow. Also, you can check out the larger version here.
Step 1 – Setting up the document
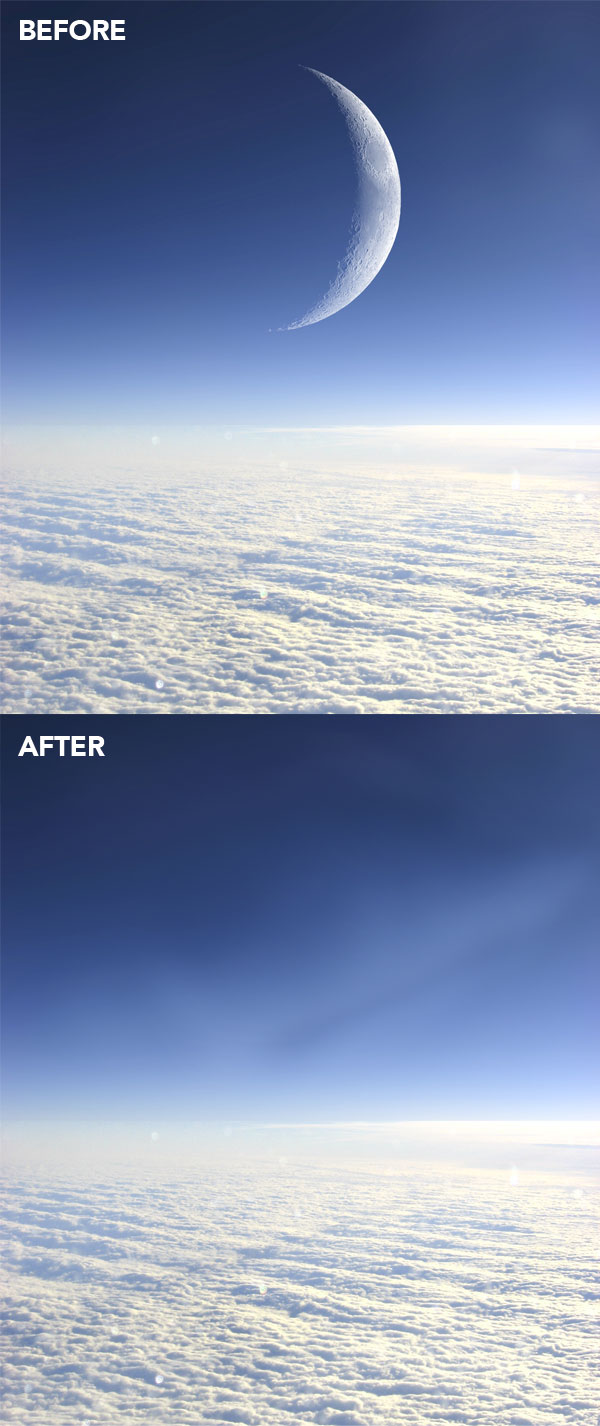
First, download this image and open it in Photoshop. You can adjust the dimensions of your image by going to Image > Image Size. My image is 1125px wide by 1334px height. Now we want to get rid of the moon because it doesn’t fit with what we are going to create in this tutorial. Select the Clone Stamp Tool (S), select a soft brush with the diameter of 250-300px and use it to erase the moon. Then select the Smudge Tool, chose a big soft brush, set the Strength to 25% and use this tool to get rid of the traces left by the Clone Stamp Tool.
Step 2 – Adding a Lens Flare filter
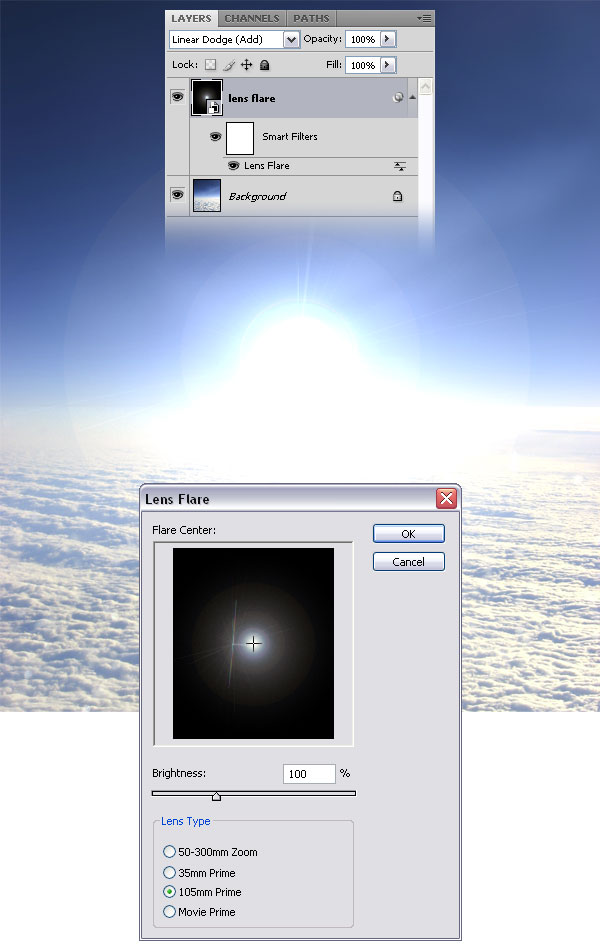
Create a new layer and fill it with black using the Paint Bucket Tool (G). Right-click on this layer and select Convert to Smart Object. This way you will be able to modify any filter you apply to this layer anytime you want. Then go to Filter > Render > Lens Flare and use the settings from the following image. Set the blend mode of this layer to Linear Dodge (Add) and name it “lens flare.”
Step 3 – Creating mist
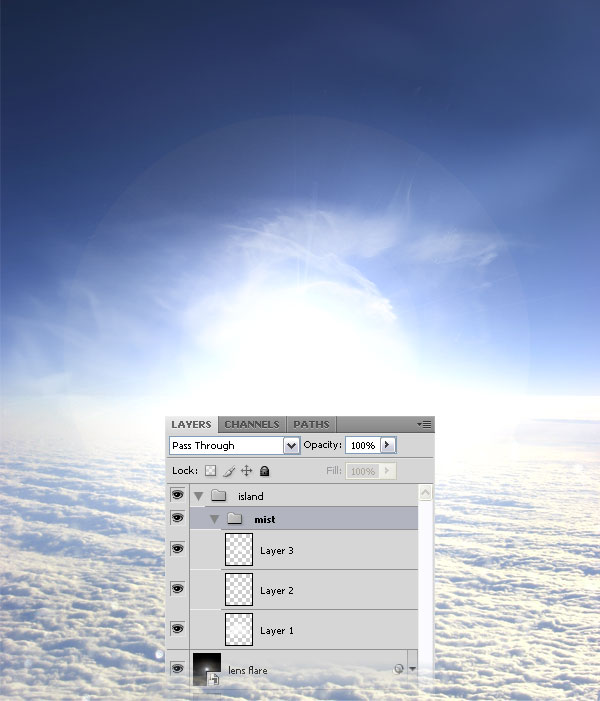
From now on, we are going to use groups to keep everything organized. Create a new group (Layer > New > Group) and name it “island.” Create another group inside the “island” group, and name this one “mist.” Download these Photoshop brushes and install them. Create a new layer, set the foreground color to white, select one of the brushes you downloaded and use it to create mist in the center of your image. Fell free to use as many layers and brushes you want.
Step 4 – Creating the base of the island
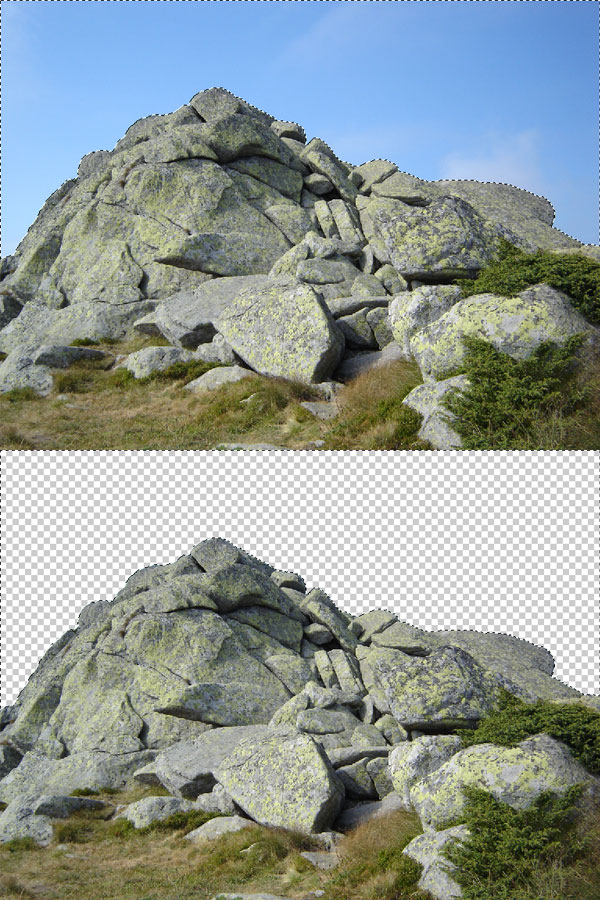
Create a new group and name this one “rocks.” Download this image and open it in Photoshop. Double-click on the “Background” layer to unlock it. Then use the Magic Wand Tool (W) to select the sky, and then hit Delete.
Step 5
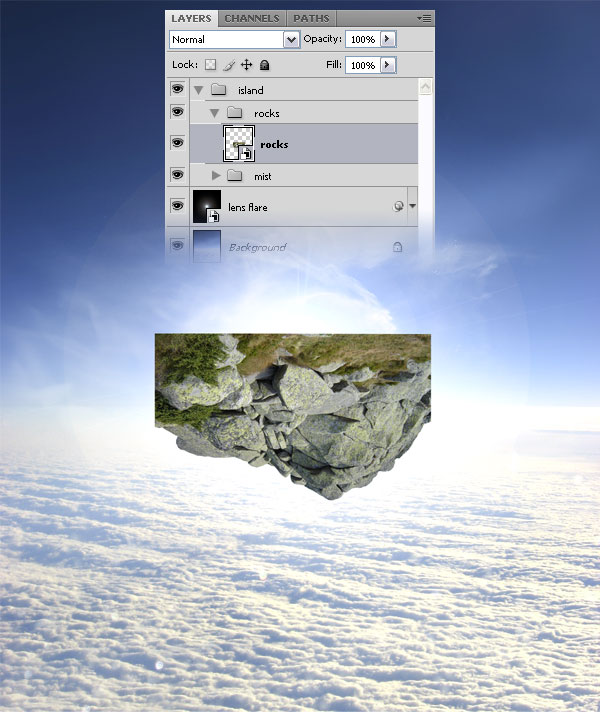
Move the rocks into your first document using the Move Tool (V). Then right-click on this layer and select Convert to Smart Object. Go to Edit > Free Transform (Ctrl+T), hold down the Shift key and scale this layer down. Flip this layer horizontally (Edit > Transform > Flip Horizontal) and vertically (Edit > Transform > Flip Vertical), and then name it “rocks.”
Step 6 – Masking the rocks
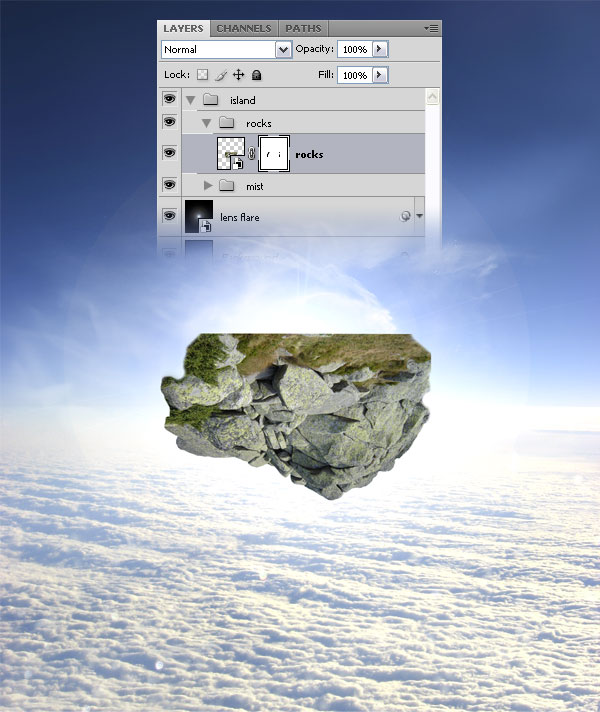
Add a mask to the “rocks” layer (Layer > Layer Mask > Reveal All), select a black brush with a diameter of 30px and with the hardness around 60%, and then mask some parts of the rocks like I did. You can let the top of the rocks as it is because it will be covered by grass later.
Step 7 – Adding light to the rocks
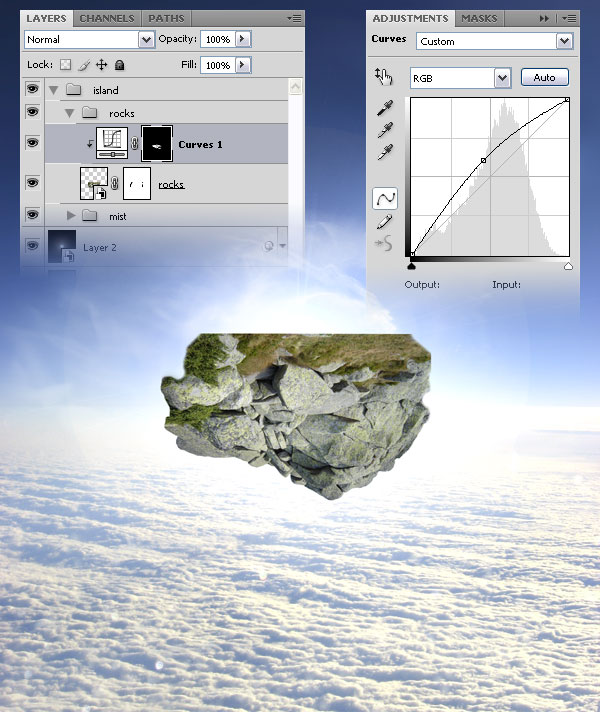
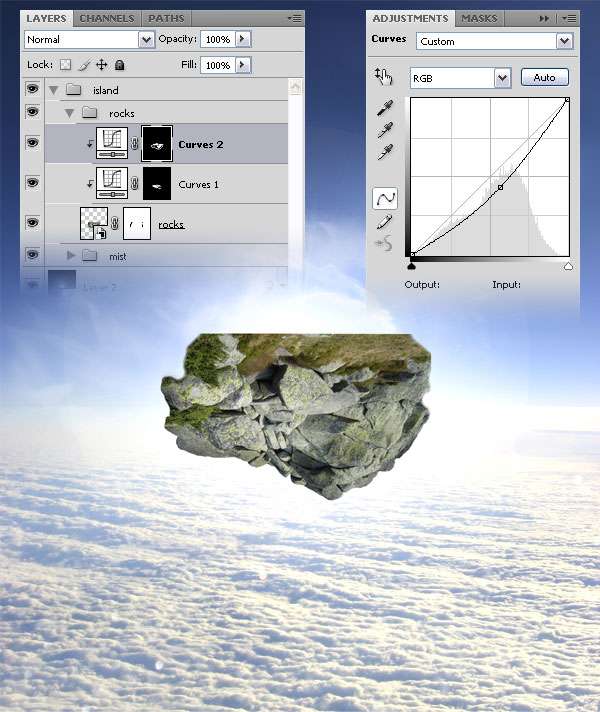
Go to Layer > New Adjustment Layer > Curves, check the “Use Previous Layer to Create Clipping Mask” option and create a curve like I did. Then fill the mask of this layer with black, select a white soft brush and paint with it over some areas of the rocks. Take a look at the following image for reference.
Step 8 – Adding shadow to the rocks
Go again to Layer > New Adjustment Layer > Curves, check the “Use Previous Layer to Create Clipping Mask” option and create a curve like I did. Then fill the mask of this layer with black, select a white soft brush and paint with it over some areas of the rocks.
Step 9 – Adjusting the brightness and the contrast
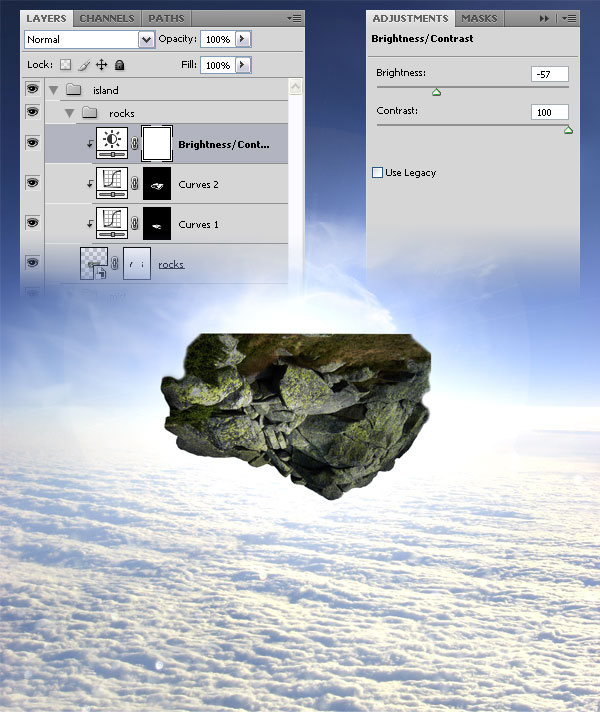
Go to Layer > New Adjustment Layer > Brightness/Contrast, check the “Use Previous Layer to Create Clipping Mask” option and use the settings from the following image.
Step 10 – Masking the rocks
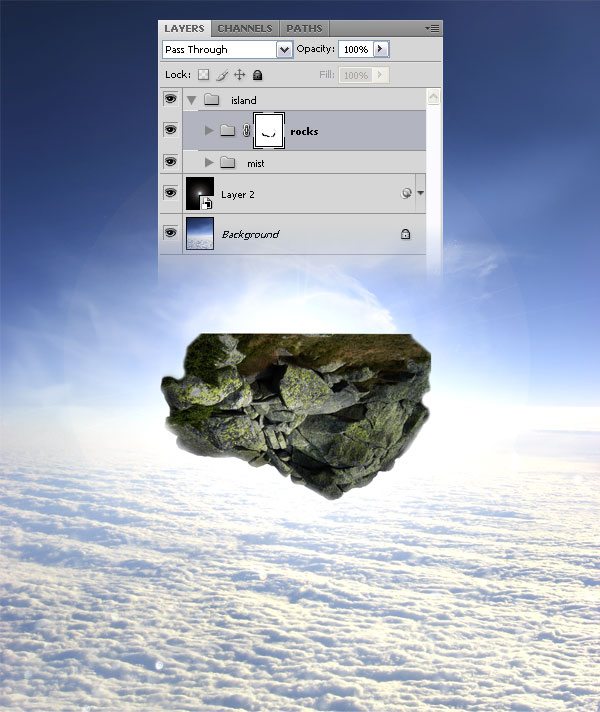
Add a mask to the “rocks” group, select a big black soft brush with the opacity around 50% and mask the edge of the island, to be able to see just a little the light that is coming behind it.
Step 11 – Adding the grass
Create a new group and name it “grass.” Then download this image, open it in Photoshop, move it into your first document using the Move Tool (V) and name this layer “grass.”
Step 12
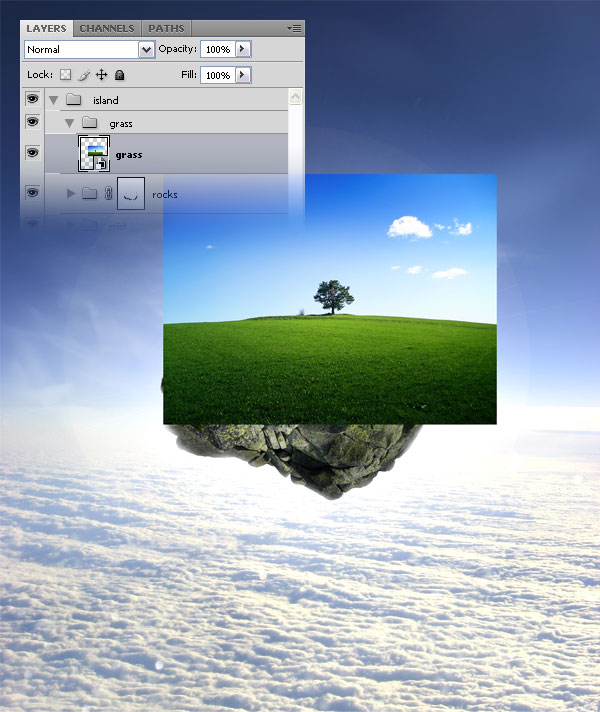
Add a black mask to the “grass” layer (Layer > Layer Mask > Hide All). Now the grass should disappear, but don’t worry, it’s still there. Set the foreground color to white, select the Brush Tool (B) and use a brush with a diameter of 40px and with a hardness of 55% to paint over the top of the island. Take a look at the following image for reference.
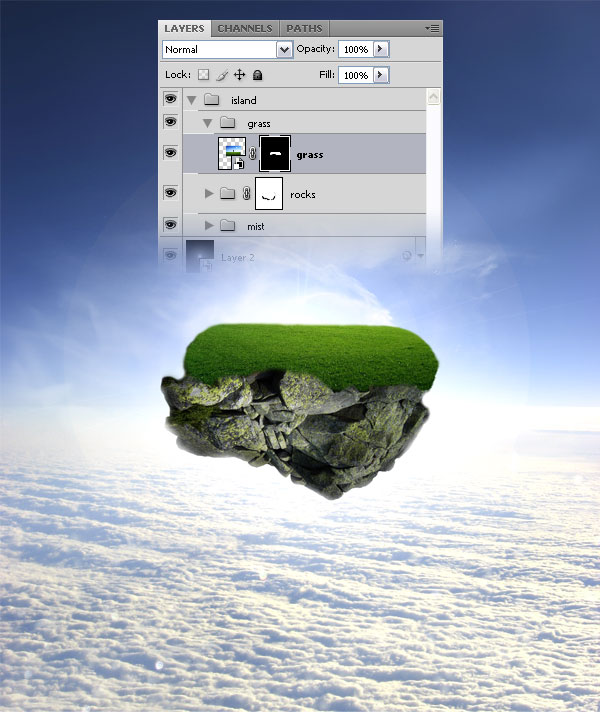
Step 13 – Adjusting the light and the shadow of the grass
Go to Layer > New Adjustment Layer > Brightness/Contrast, check the “Use Previous Layer to Create Clipping Mask” option and use the settings from the following image.
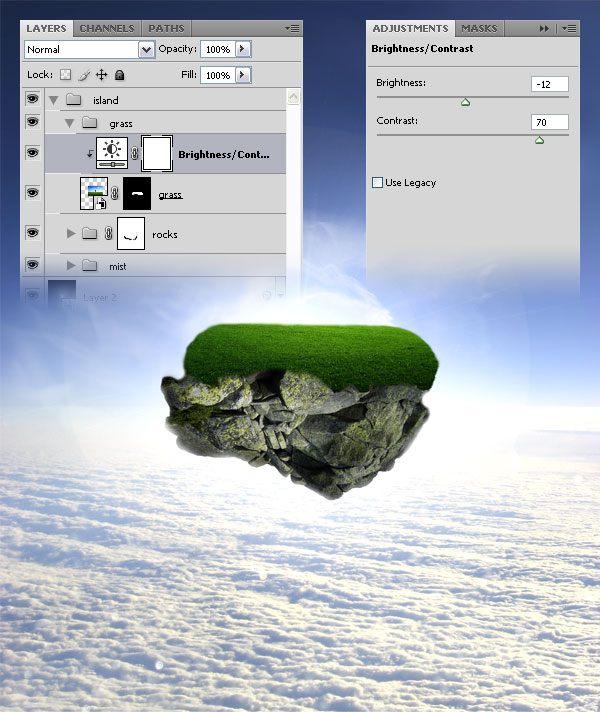
Step 14
Now we are going to make the bottom area of the grass layer darker. Go to Layer > New Adjustment Layer > Curves, check the “Use Previous Layer to Create Clipping Mask” option and use the settings from the following image. Then fill the mask of this layer with black, select a white soft brush and paint with it over the bottom area of the grass.
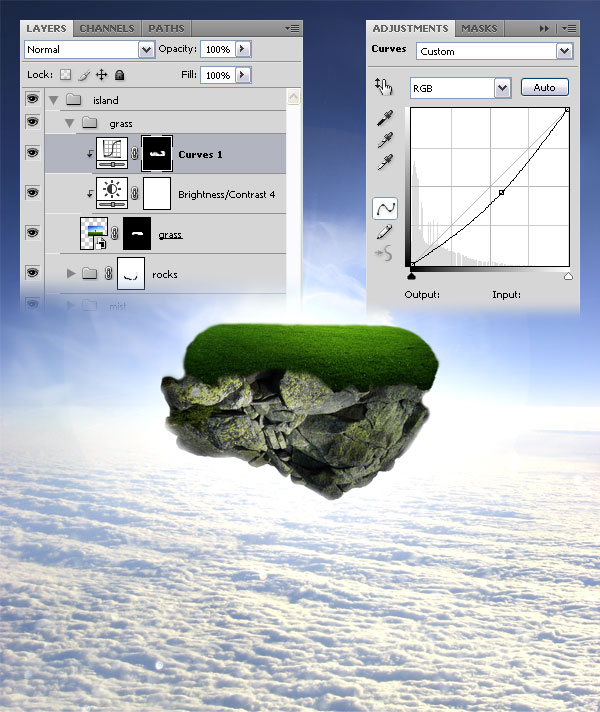
Step 15
Now we are going to make the top of the grass layer brighter. Go to Layer > New Adjustment Layer > Curves, check the “Use Previous Layer to Create Clipping Mask” option and use the settings from the following image. Then fill the mask of this layer with black, select a white soft brush and paint with it over the top area of the grass.
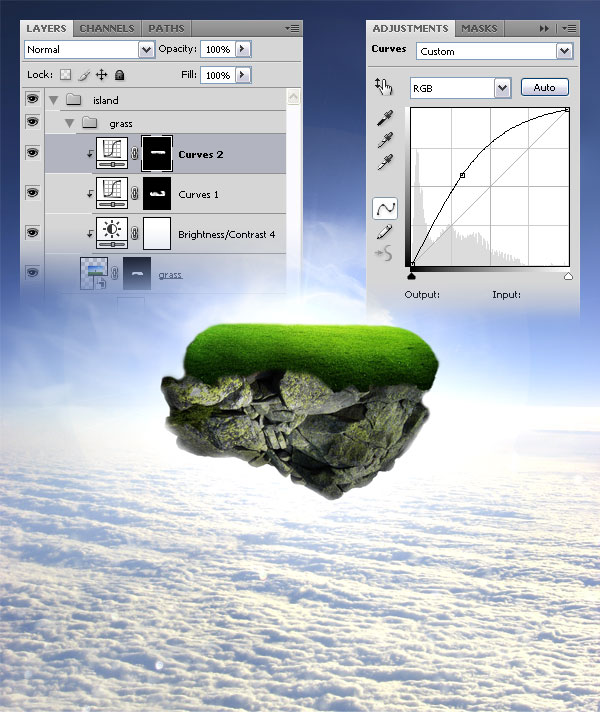
Step 16
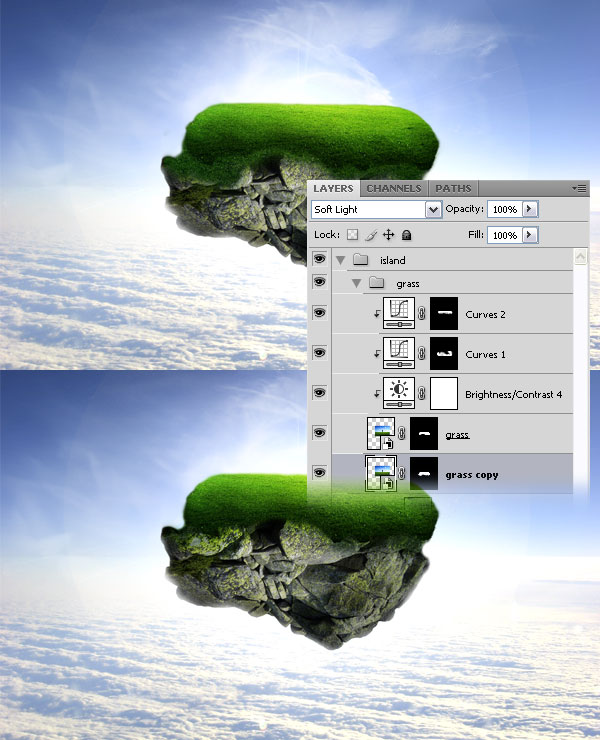
The passing between the rocks and the grass is not very realistic right now. To correct this, hold down the Alt key, click on the “grass” layer in the Layers palette and drag a copy of it beneath the original one. Then click on the mask of this layer to activate it, select a white soft brush, and paint with it over the area beneath the original grass layer. Set the opacity of this layer to Soft Light.
Step 17 – Adding a fence
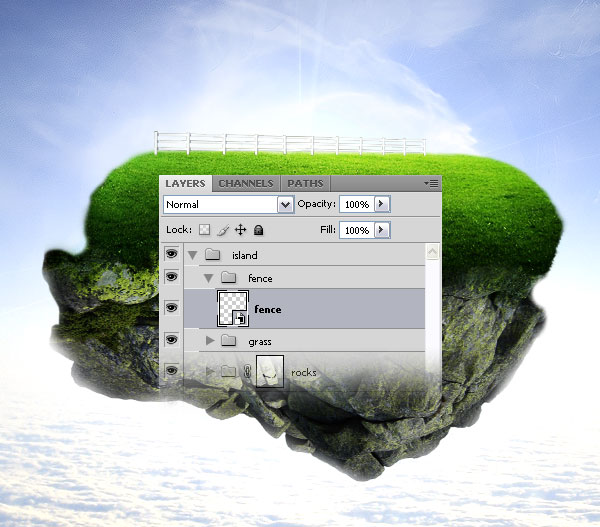
Download this photo, open it in Photoshop and use the Pen Tool (P) to cut out the fence. To remove the hydrant you can use the Clone Stamp Tool (S). Then move the fence into your document, right-click on it and select Convert to Smart Object. Go to Edit > Free Transform (Ctrl+T), hold down the Shift key, scale this layer down, and put the fence on your island. Name this layer “fence”, then put it inside a new group and name the group “fence” too.
Step 18
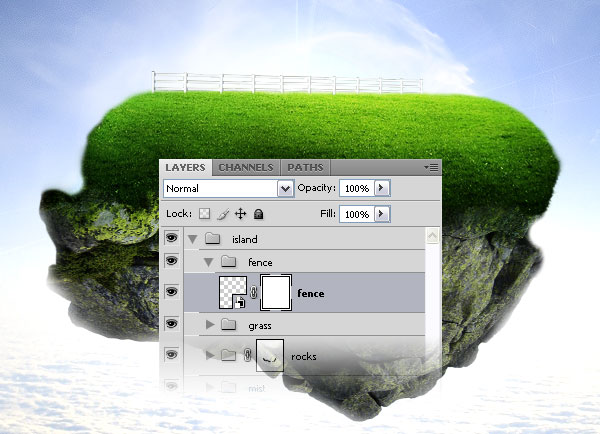
Add a mask to the “fence” layer, select a black little soft brush, set the opacity of this brush around 40% and mask the bottom area of the fence, to look like it is really there.
Step 19 – Adding a shadow to the fence
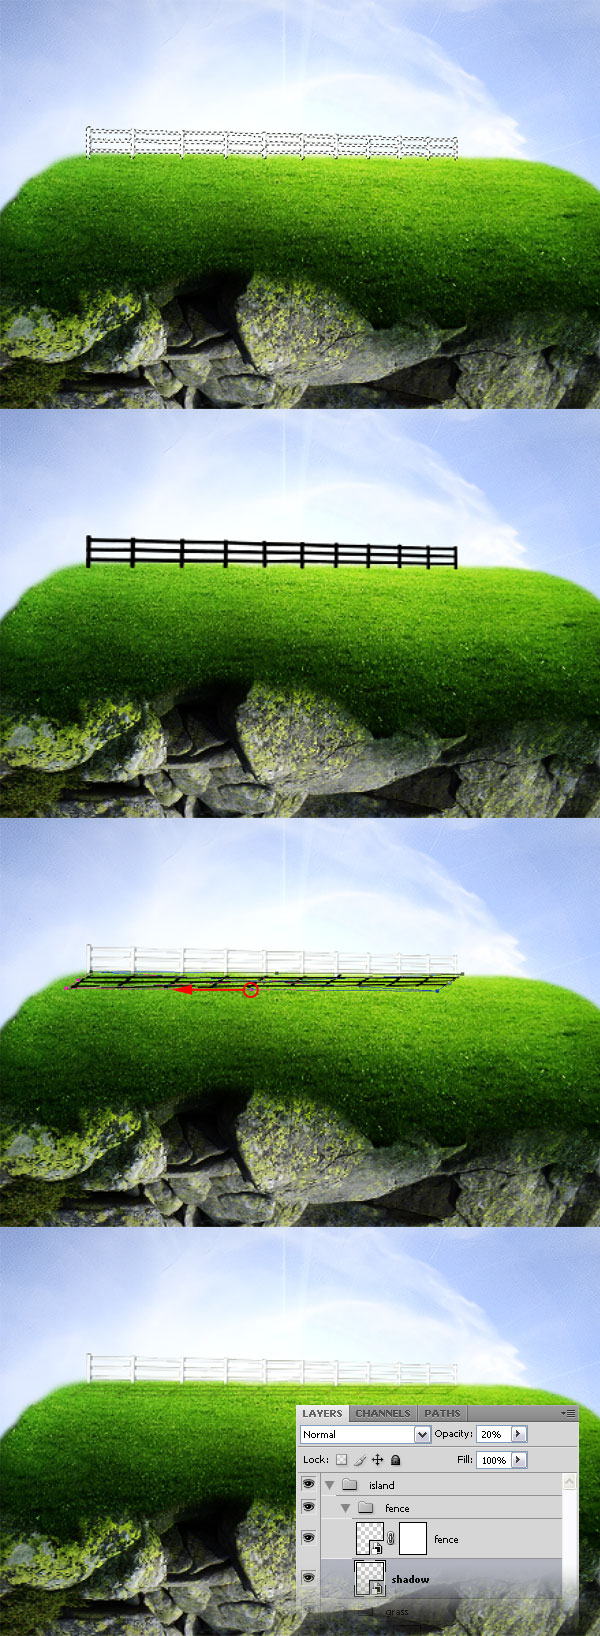
Ctrl-click on the “fence” layer’s thumbnail to select it, create a new layer and fill the selection with black. Then go to Edit > Free Transform, right-click on the image, select Flip Vertical, move this layer at the bottom of the fence, hold down the Ctrl key and move the middle bottom control handle like I did. Set the opacity of this layer to 20%, move it beneath the “fence” layer and name it “shadow.”
Step 20 – Adding a cave
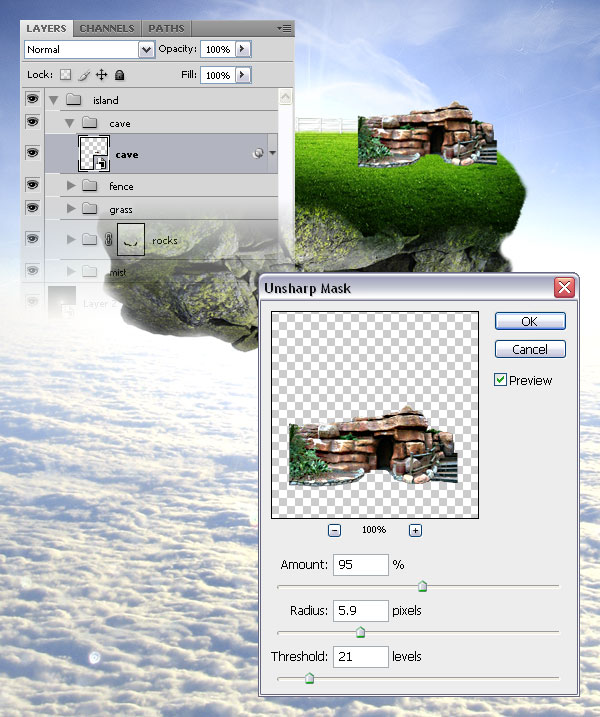
Create a new group and name it “cave.” Download this photo, open it in Photoshop, use the Pen Tool (P) to cut out the cave, and then move it into your document using the Move Tool (V). Right-click on this layer and select Convert to Smart Object. Go to Edit > Free Transform (Ctrl+T), right-click on the image and select Flip Horizontal, then hold down the Shift key and scale this layer down. Go to Filter > Sharpen > Unsharp Mask and use the settings from the following image. Name this layer “cave.”
Step 21
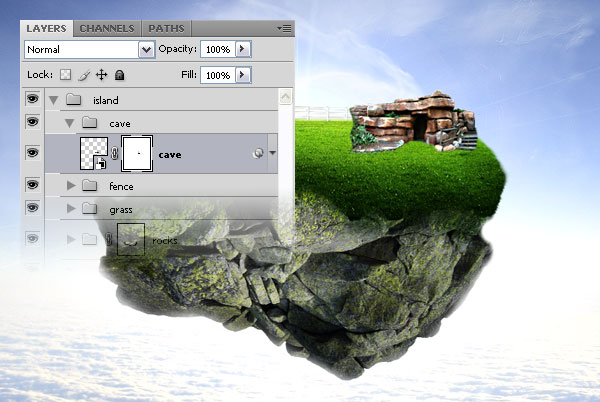
Add a mask to this layer (Layer > Layer Mask > Reveal All), select a brush with a hardness of 80% and use it to erase the straight edges of the cave.
Step 22
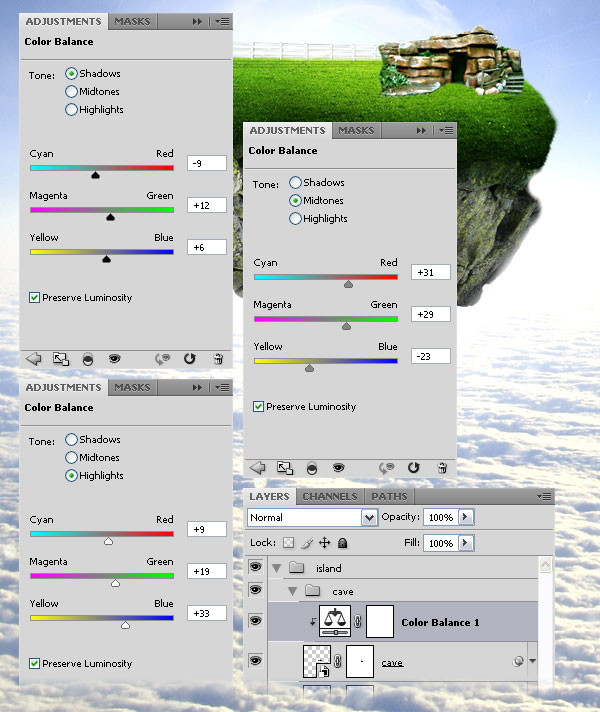
Go to Layer > New Adjustment Layer > Color Balance, check the “Use Previous Layer to Create Clipping Mask” option and use the settings from the following image.
Step 23
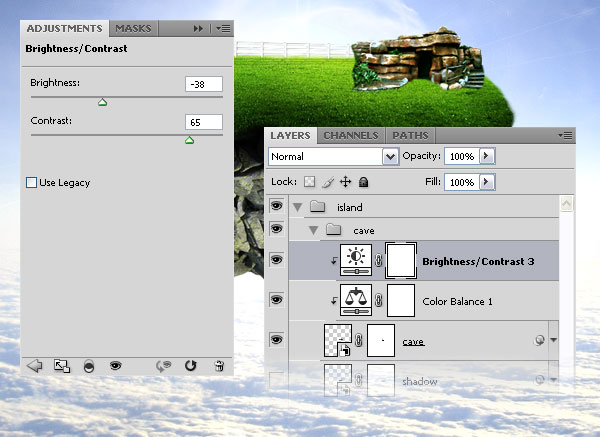
Go to Layer > New Adjustment Layer > Brightness/Contrast, check the “Use Previous Layer to Create Clipping Mask” option and use the settings from the following image.
Step 24
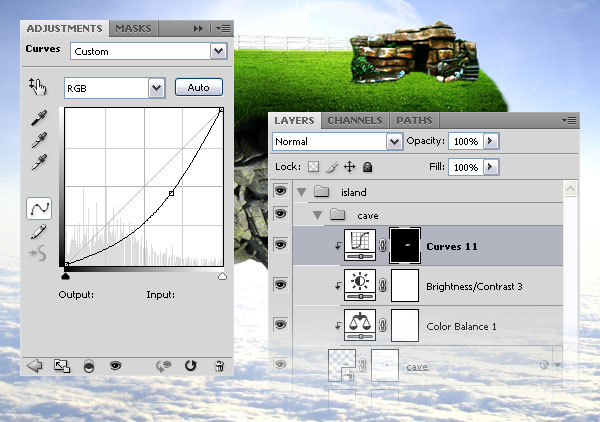
Now we are going to make the bottom of the cave darker. Go to Layer > New Adjustment Layer > Curves, check the “Use Previous Layer to Create Clipping Mask” option and create a curve like I did. Then fill the mask of this layer with black, select a white soft brush (B) and paint with it over the bottom part of the cave.
Step 25
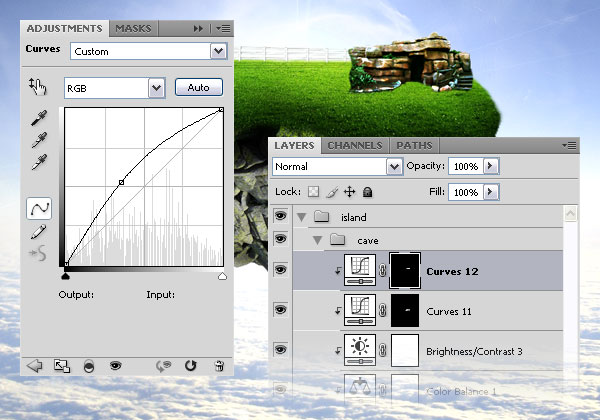
Now we are going to make the top of the cave brighter. Go to Layer > New Adjustment Layer > Curves, check the “Use Previous Layer to Create Clipping Mask” option and use the settings from the following image. Then fill the mask of this layer with black, select a white soft brush (B) and paint with it over the top area of the cave.
Step 26 – Adding a shadow to the cave
Ctrl-click on the “cave” layer’s thumbnail to select the cave, then hold down the keys Ctrl+Alt+Shift and click on the mask of the “cave” layer. Now you should have only the cave selected. Create a new layer beneath the “cave” layer, fill it with black and name it “shadow.”
Go to Edit > Transform >Flip Vertical and move the “shadow” layer at the bottom of the cave. Then go to Edit > Free Transform (Ctrl+T), hold down the Ctrl key and transform the shadow like I did by moving the middle bottom control handle of the Free Transform box.
Now there is an empty area at the bottom of the cave because of the cave’s entry. Use a black brush to fill that area. Then right-click on the “shadow” layer and select Convert to Smart Object. Then go to Filter > Blur > Gaussian Blur and add a gaussian blur of 3px. Set the opacity of the “shadow” layer to 60%. Then you can use a layer mask and a black soft brush to mask the area of the shadow which looks too dark.

Step 27 – Adding trees
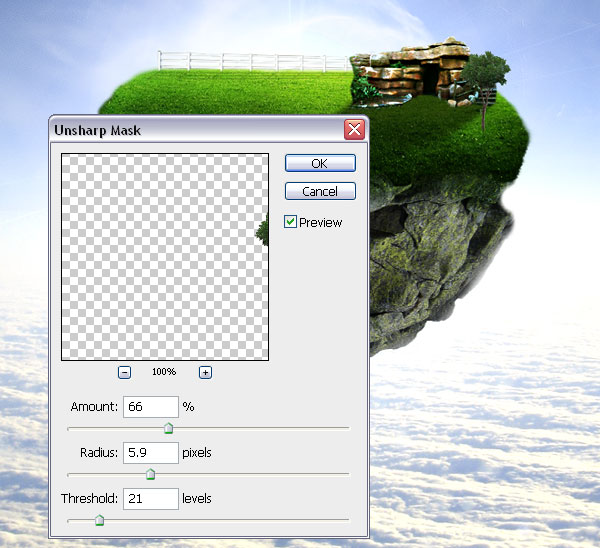
Download this image, open it in Photoshop, move the tree into your document using the Move Tool (V) and put it in the front of the cave. Right-click on this layer and select Convert to Smart Object. Go to Edit > Free Transform, hold down the Shift key and scale this layer down. Then go to Filter > Sharpen > Unsharp Mask and use the settings from the following image. Name this layer “tree.”
Step 28
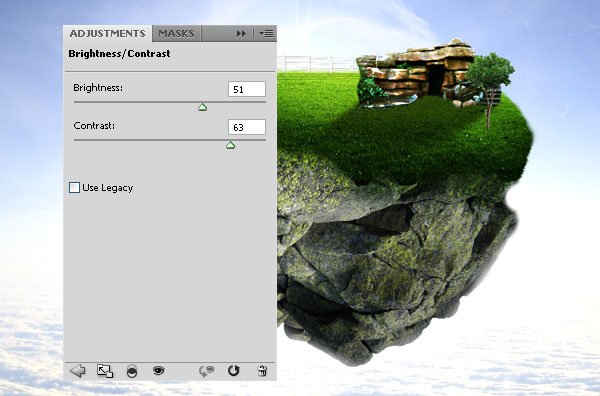
Go to Layer > New Adjustment Layer > Brightness/Contrast, check the “Use Previous Layer to Create Clipping Mask” option and use the settings from the following image.
Step 29
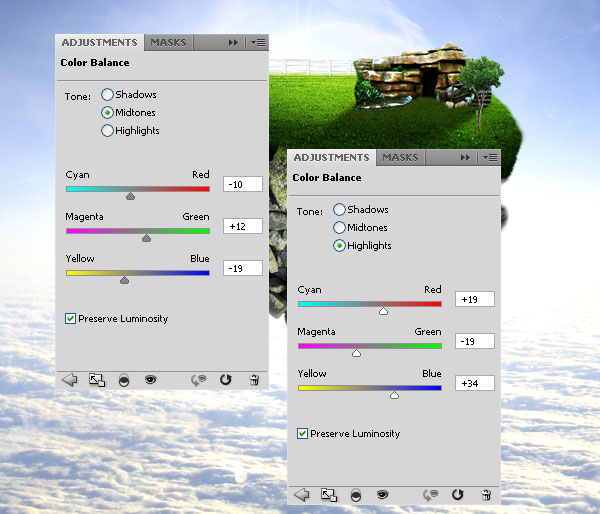
Go to Layer > New Adjustment Layer > Color Balance, check the “Use Previous Layer to Create Clipping Mask” option and use the settings from the following image.
Step 30
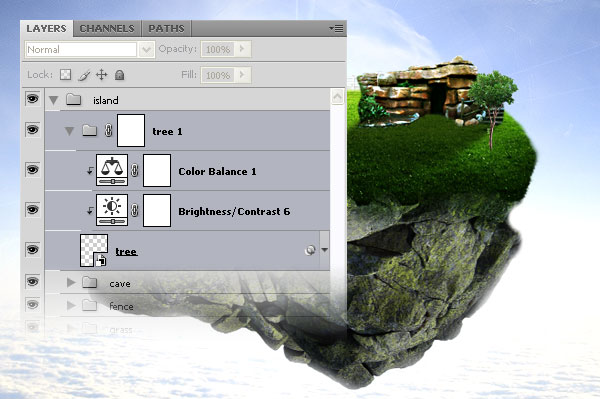
Put the “tree” layer and the two adjustment layers inside a group and name the group “tree 1.” Then add a mask to this group and use a black soft brush to mask the bottom part of the tree.
Step 31
Create a shadow for the tree, just like you did with the fence and the cave.

Step 32
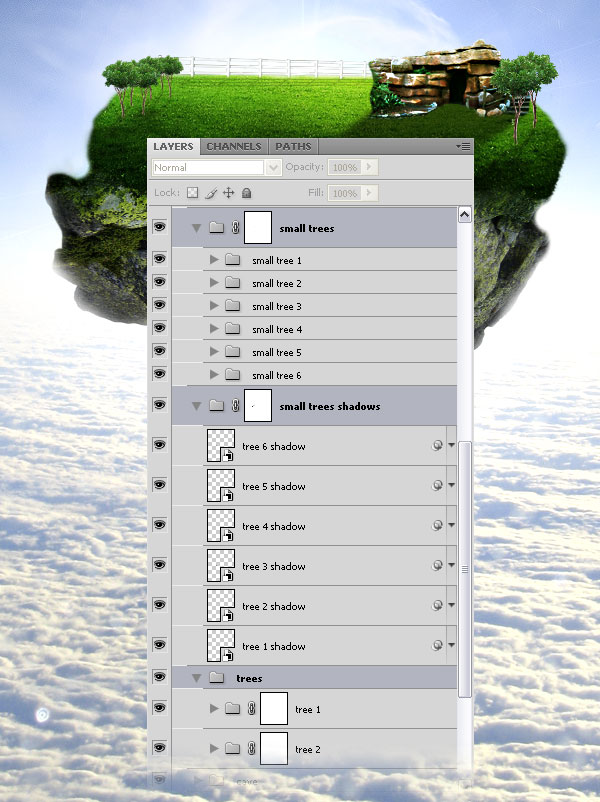
Create more trees and put them on the island. Organize all these layers using groups. Take a look at the following image for reference.
Step 33 – Adding an angel statue
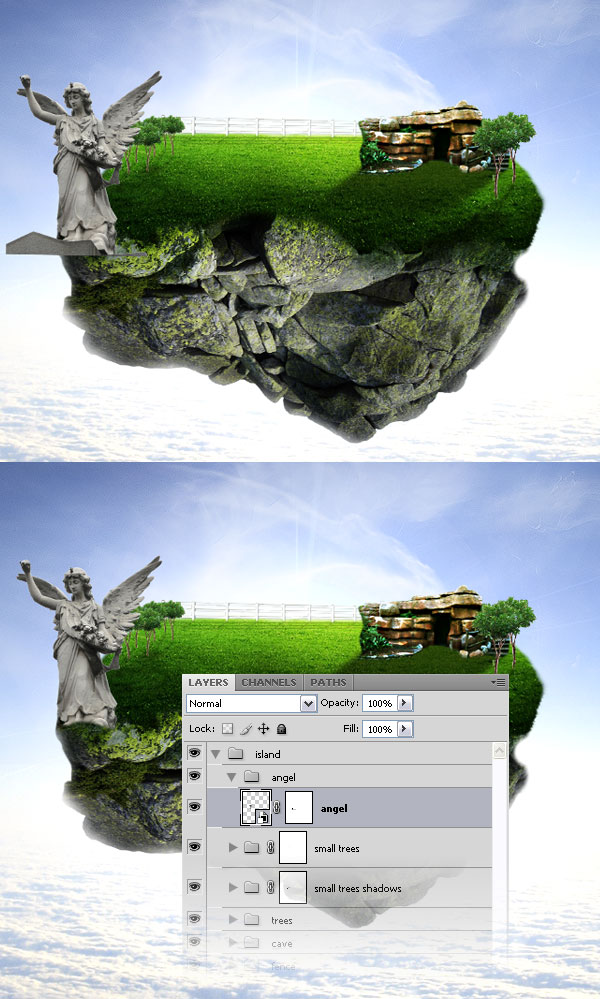
Download this image, open it in Photoshop, use the Pen Tool (P) to cut out the angel statue and move it into your document using the Move Tool (V). Right-click on this layer and select Convert to Smart Object. Name this layer “angel”, put it inside a group and name the group “angel” too. Go to Edit > Free Transform (Ctrl+T), hold down the Shift key and scale this layer down. Add a mask to this layer and use a black soft brush to mask the bottom part of the angel.
Step 35
Go to Layer > New Adjustment Layer > Brightness/Contrast, check the “Use Previous Layer to Create Clipping Mask” option and use the settings from the following image.
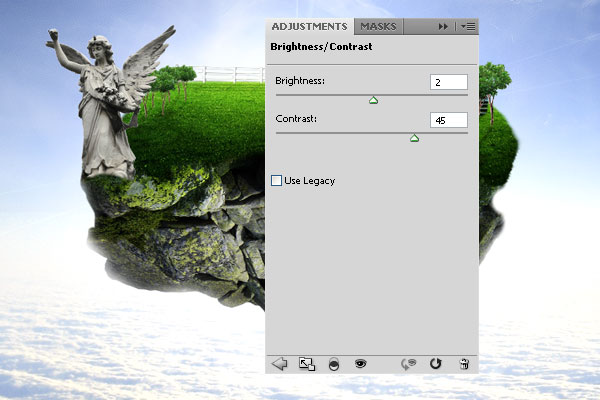
Step 36
Go to Layer > New Adjustment Layer > Curves, check the “Use Previous Layer to Create Clipping Mask” option and create a curve like I did. Fill the mask of this layer with black, select a white soft brush and paint with it over some areas of the angel to make them darker.
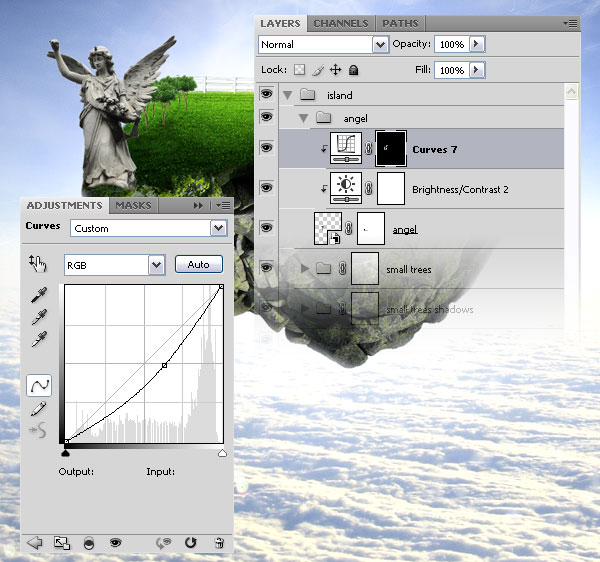
Step 37
Go to Layer > New Adjustment Layer > Curves, check the “Use Previous Layer to Create Clipping Mask” option and create a curve like I did. Fill the mask of this layer with black, select a white soft brush and paint with it over some areas of the angel to make them brighter.
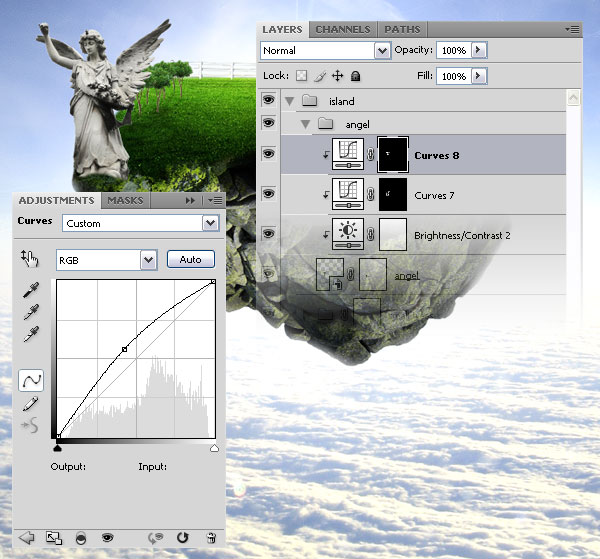
Step 38
Create a new group (Layer > New > Group) and name it “ivy.” Then download this image, open it in Photoshop and move it into your document using the Move Tool (V). Right-click on this layer and select Convert to Smart Object. Go to Edit > Free Transform, hold down the Shift key and scale this layer down. Put the plant at the bottom of the angel statue and name this layer “ivy.”
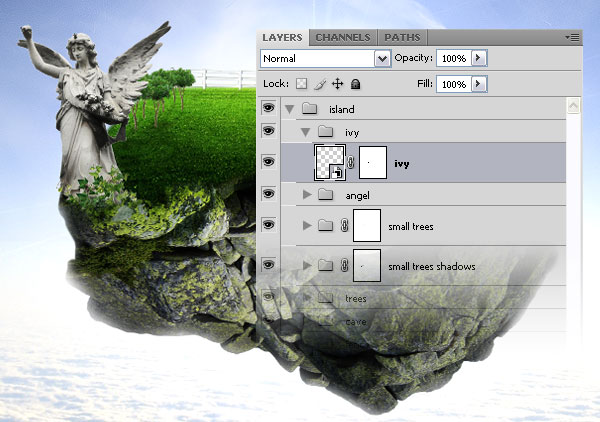
Step 39
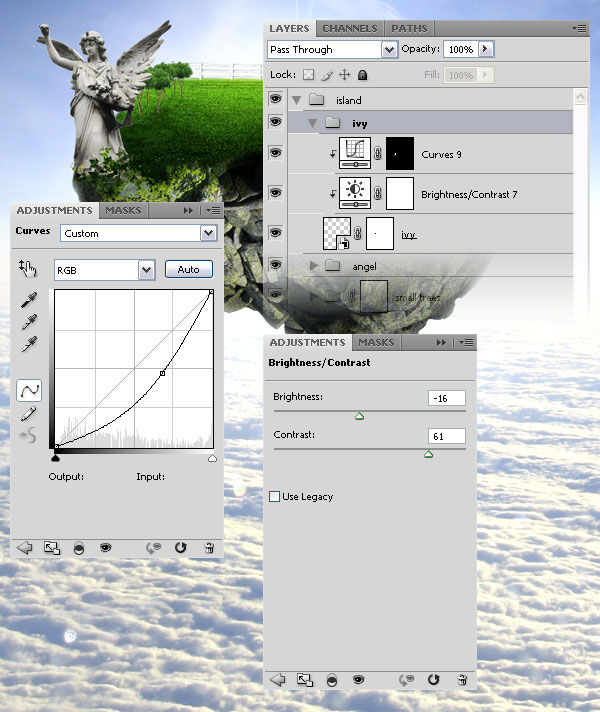
Go to Layer > New Adjustment Layer > Brightness/Contrast, check the “Use Previous Layer to Create Clipping Mask” option and use the settings from the following image.
Then go to Layer > New Adjustment Layer > Curves, check the “Use Previous Layer to Create Clipping Mask” option and create a curve like I did. Fill the mask of this layer with black, select a white soft brush and paint with it over the bottom area of the plant to make it darker.
Step 40
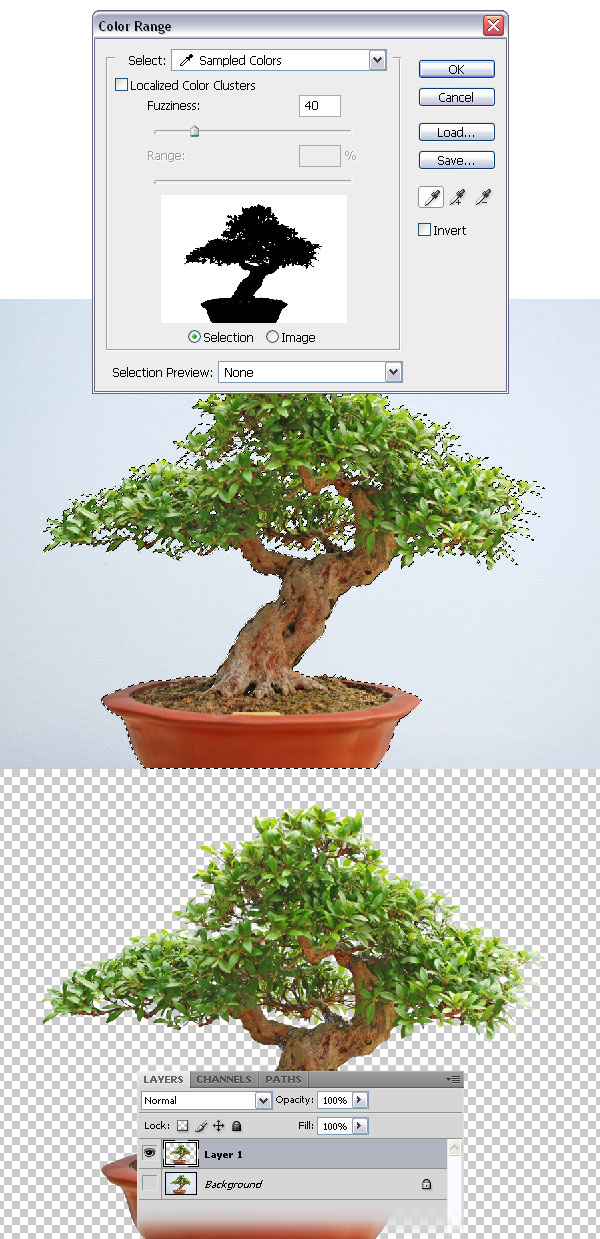
Download this bonsai photo and open it in Photoshop. To separate the tree from the background go to Select > Color Range, hold down the Shift key, and click on the background many times until it turns white in the Color Range window. Then go to Select > Inverse to inverse the selection and hit Ctrl+J to put the selection into a new layer. To delete the pot you can use the Pen Tool (P).
Step 41
Move the tree into your document using the Move Tool (V). Name this layer “bonsai”, put it inside a group and name the group “bonsai” too. Right-click on this layer and select Convert to Smart Object, go to Edit > Free Transform (Ctrl+T), hold down the Shift key and scale this layer down.
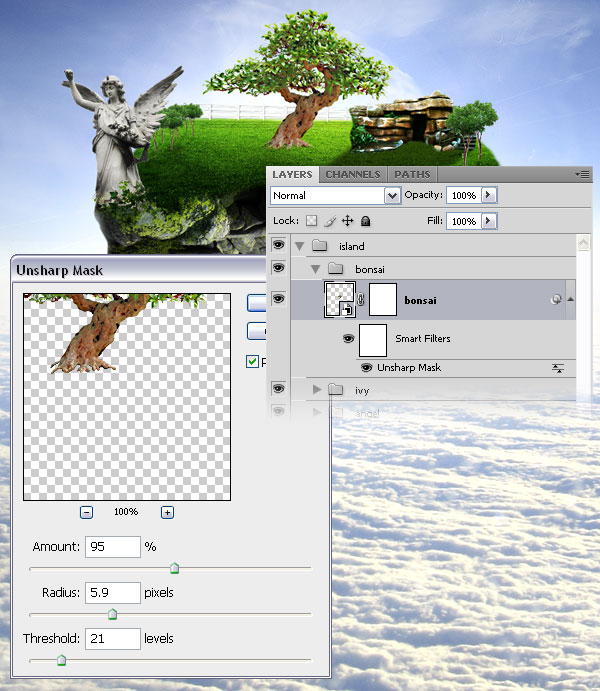
Add a mask to the “bonsai” layer and use a black small soft brush to mask the tree’s roots. Then go to Filter > Sharpen > Unsharp Mask and use the settings from the following image.
Step 42
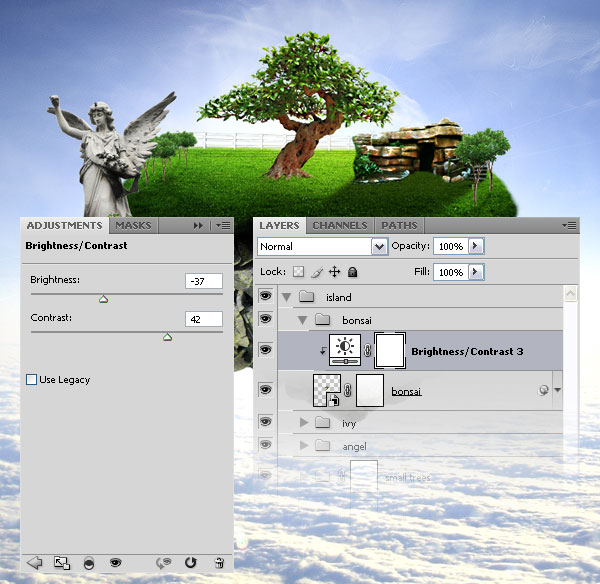
Go to Layer > New Adjustment Layer > Brightness/Contrast, check the “Use Previous Layer to Create Clipping Mask” option and use the settings from the following image.
Step 43
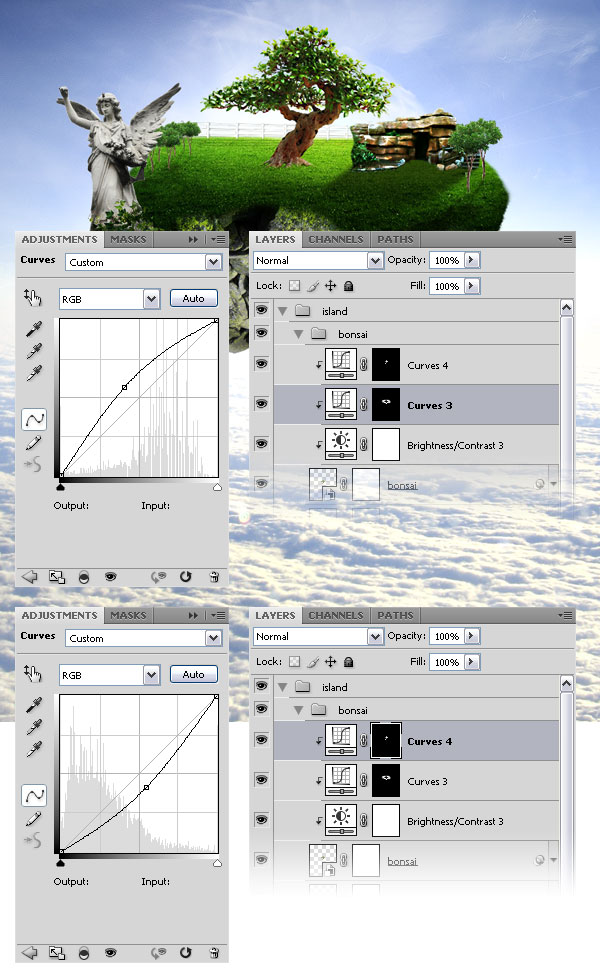
Go to Layer > New Adjustment Layer > Curves, check the “Use Previous Layer to Create Clipping Mask” option and create a curve like I did. Fill the mask of this layer with black, select a white soft brush and paint with it over some areas of the tree to make them darker.
Then go again to Layer > New Adjustment Layer > Curves, check the “Use Previous Layer to Create Clipping Mask” option and create a curve like I did. Fill the mask of this layer with black, select a white soft brush and paint with it over some areas of the tree to make them brighter.
Step 44
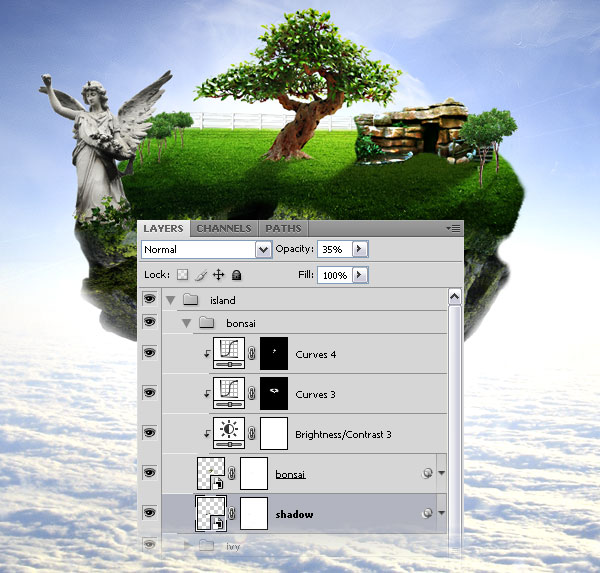
Add a shadow to the bonsai, just like you did with the fence, the cave and the trees.
Step 45
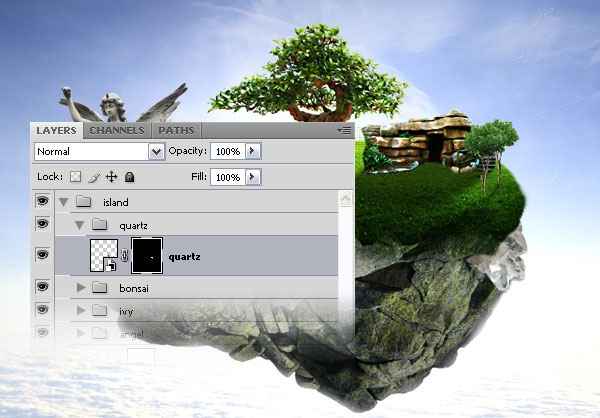
Download this quartz image, open it in Photoshop and use the Magic Wand Tool (W) to remove the black background. Move the quartz into your document, right-click on this layer and select Convert to Smart Object. Go to Edit > Free Transform (Ctrl+T) and scale this layer down. Then put the quartz in the right side of the island. Name this layer “quartz”, put it inside a new group and name the group “quartz” too.

Step 46
Add a black mask to the “quartz” layer (Layer > Layer Mask > Hide All). Now the quartz should disappear from your image, but don’t worry, it’s still there. Select a white brush with a hardness of 50% and paint with this brush over the area where you want the quartz to become visible.
Step 47
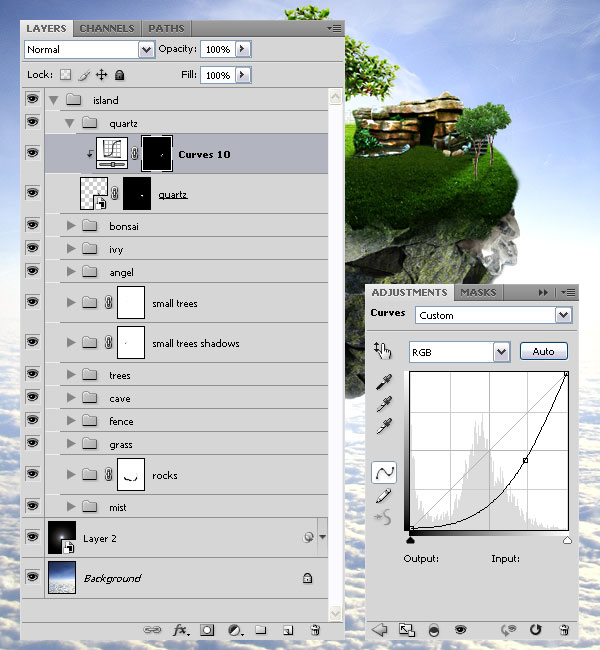
Go to Layer > New Adjustment Layer > Curves, check the “Use Previous Layer to Create Clipping Mask” option and create a curve like I did. Fill the mask of this layer with black, select a white soft brush and paint with it over the area where the quartz touches the island.
Step 48
Go to Layer > New Adjustment Layer > Brightness/Contrast, check the “Use Previous Layer to Create Clipping Mask” option and use the settings from the following image.
Then go to Layer > New Adjustment Layer > Color Balance, check the “Use Previous Layer to Create Clipping Mask” option and use the settings from the following image.
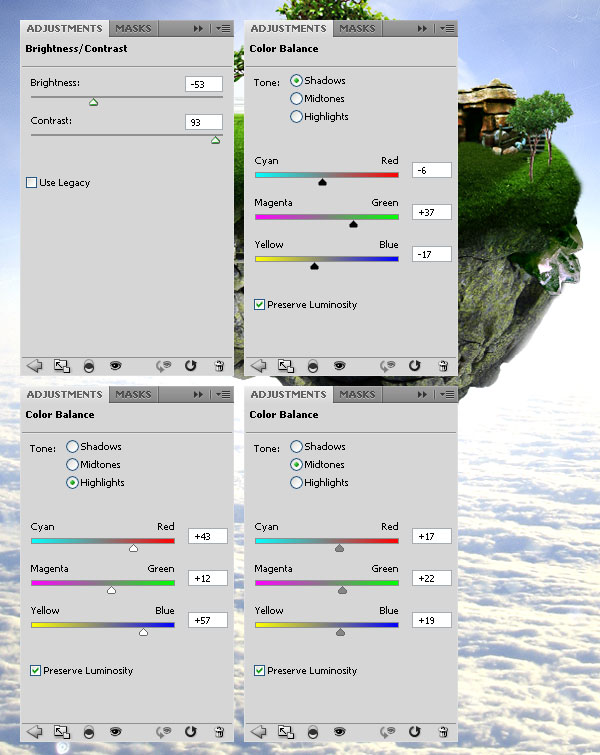
Step 49 – Adding stairs
Download this image, open it in Photoshop and use the Pen Tool to cut out the stairs. Then move the stairs into your first document using the Move Tool (V). Right-click on this layer, select Convert to Smart Object and name this layer “stairs.” Go to Edit > Transform > Flip Horizontal. Then go to Edit > Free Transform (Ctrl+T), hold down the Shift key and scale this layer down. Put this layer inside a group and name the group “stairs.”
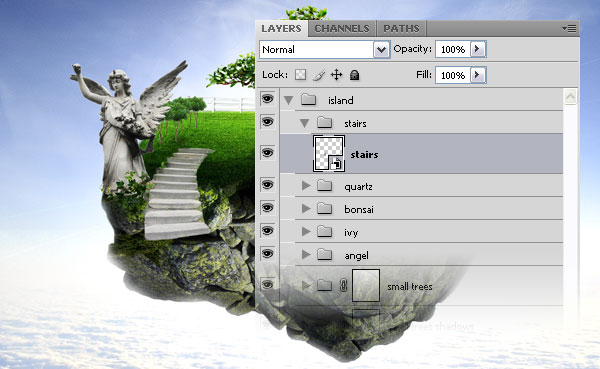
Step 50
Add a mask to the “stairs” layer (Layer > Layer Mask > Reveal All), select a black brush with a hardness of 60% and use it to mask the bottom area of the stairs.
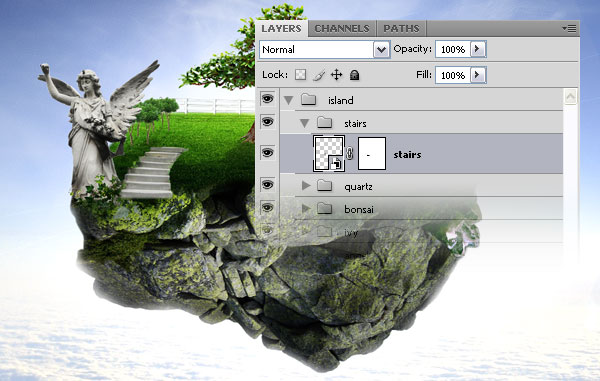
Step 51
Go to Layer > New Adjustment Layer > Brightness/Contrast, check the “Use Previous Layer to Create Clipping Mask” option and use the settings from the following image.
Then go to Layer > New Adjustment Layer > Color Balance, check the “Use Previous Layer to Create Clipping Mask” option and use the settings from the following image.
Then go to Layer > New Adjustment Layer > Curves, check the “Use Previous Layer to Create Clipping Mask” option and create a curve like I did. Fill the mask of this layer with black, select a white soft brush and paint with it over the right and bottom areas of the stairs to make them darker.
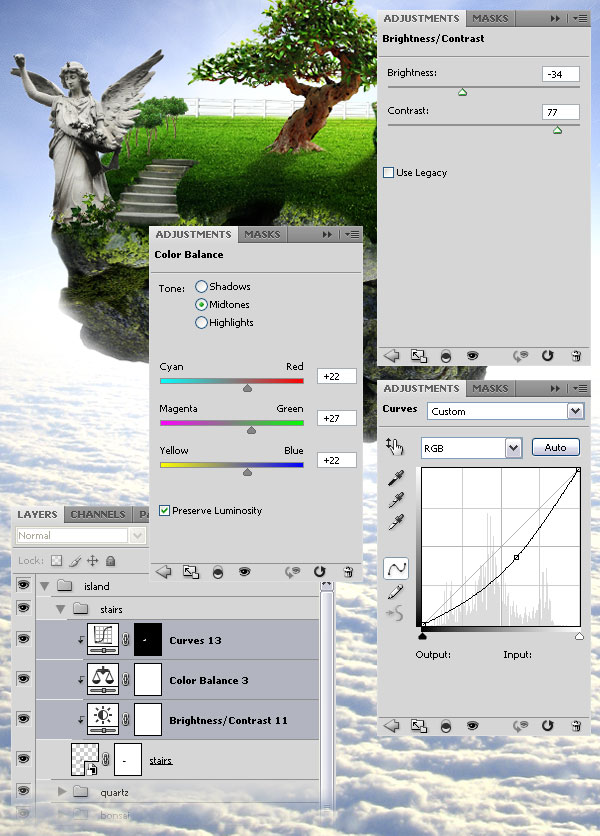
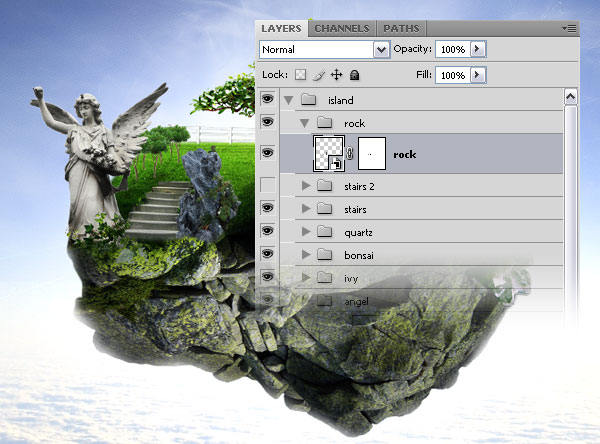
Step 52 – Adding a rock
Download this package of photos and open the image “pkg_bot015.jpg” in Photoshop. Use the Pen Tool (P) and Color Range (Select > Color Range) to separate the rock from the background (or you can use the Quick Selection Tool (W) instead of Color Range).
Move the rock into your document using the Move Tool (V), right-click on this layer and select Convert to Smart Object. Name this layer “rock” and put it inside a new group. Name the group “rock” too.
Select the “rock” layer, go to Edit > Transform > Flip Horizontal. Then go to Edit > Free Transform (Ctrl+T), scale this layer down and put it in the right side of the stairs. Then add a mask to this layer (Layer > Layer Mask > Reveal All), select a white brush with a hardness of 50% and use it to mask the bottom area of the rock. Take a look at the following image for reference.
Step 53
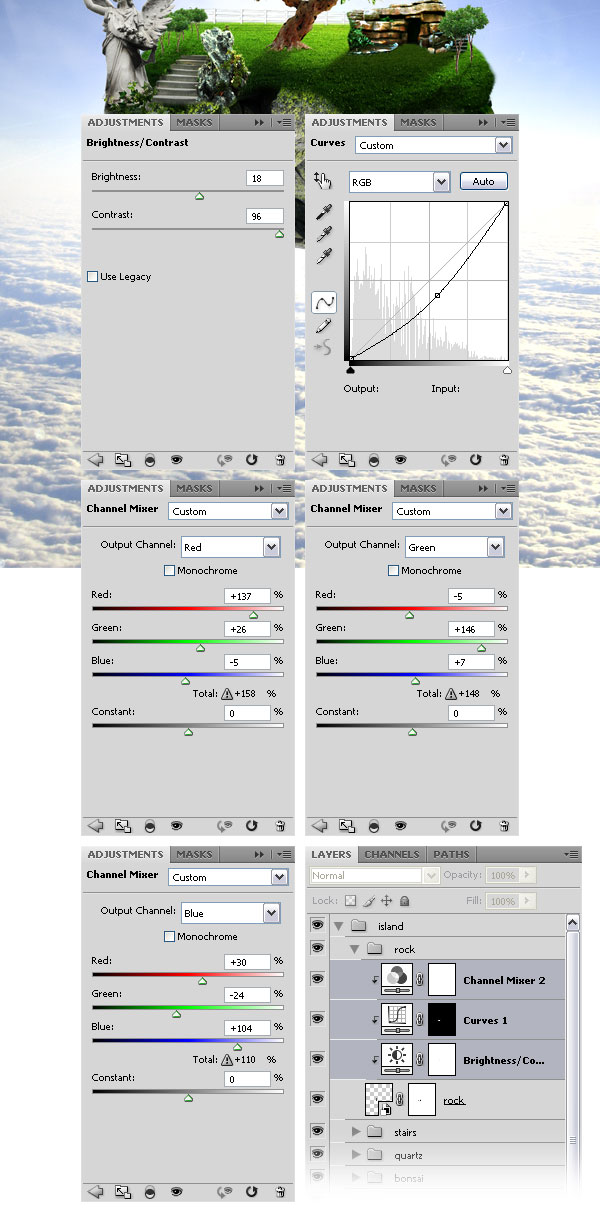
Go to Layer > New Adjustment Layer > Brightness/Contrast, check the “Use Previous Layer to Create Clipping Mask” option and use the settings from the following image.
Then go to Layer > New Adjustment Layer > Curves, check the “Use Previous Layer to Create Clipping Mask” option and create a curve like I did. Fill the mask of this layer with black, select a white soft brush and paint with it over the bottom area of the rock to make it darker.
Then go to Layer > New Adjustment Layer > Channel Mixer, check the “Use Previous Layer to Create Clipping Mask” option and use the settings from the following image.
Step 54 – Adding a tap
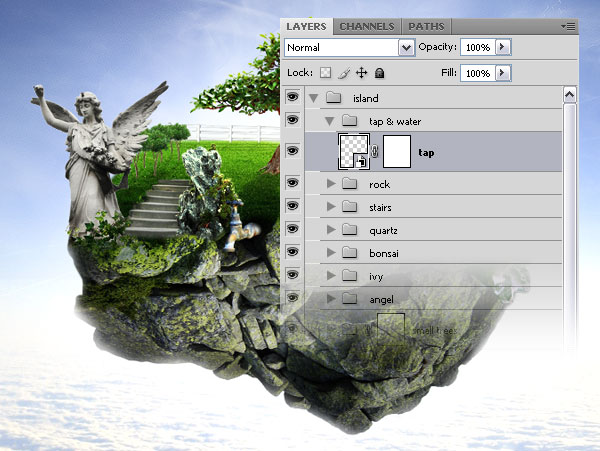
Download this photo, use the Pen Tool to cut out the tap and move it into your document. Right-click on this layer, select Convert to Smart object, and then name it “tap.” Then go to Edit > Free Transform and scale this layer down. Add a mask to this layer (Layer > Layer Mask > Reveal All) and use a black soft brush to mask the area where the tap touches the island. Put this layer inside a new group and name the group “tap & water.”
Step 55
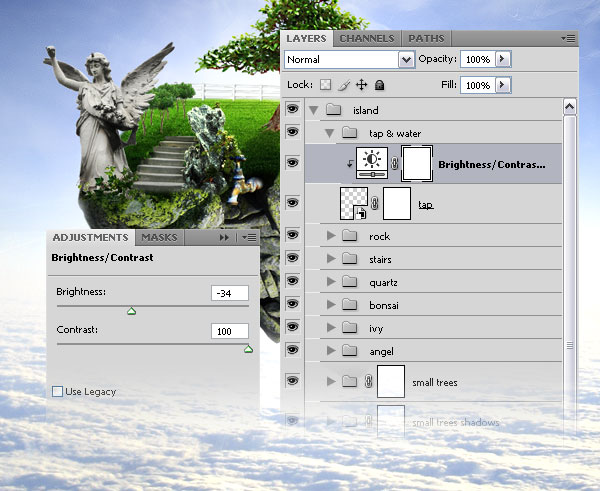
Go to Layer > New Adjustment Layer > Brightness/Contrast, check the “Use Previous Layer to Create Clipping Mask” option and use the settings from the following image.
Step 56 – Adding the water
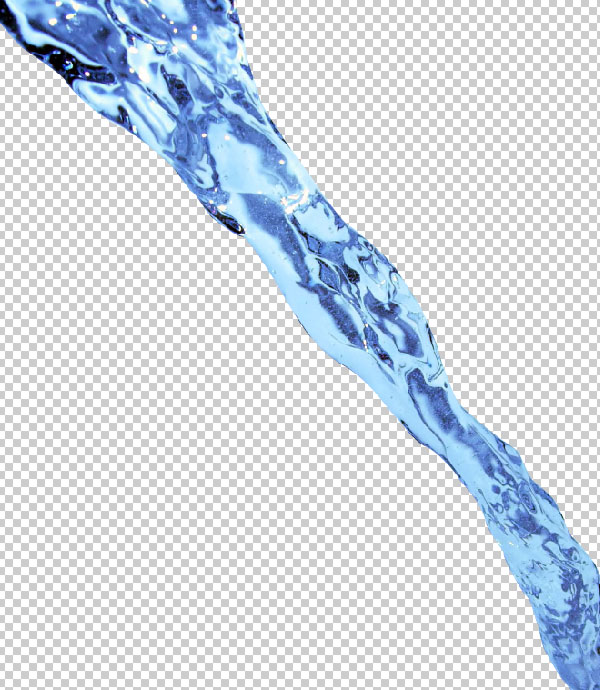
Download this image, open it in Photoshop and use the Pen Tool (P) to cut out the water.
Step 57
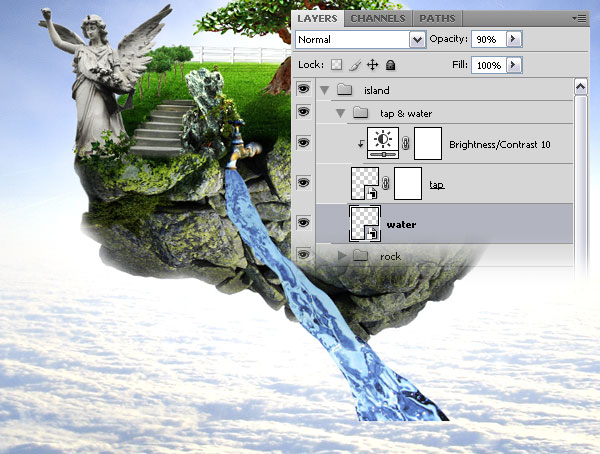
Move the water into your document using the Move Tool (V). Right-click on this layer and select Convert to Smart Object. Go to Edit > Transform > Flip Vertical, and then go to Edit > Transform > Flip Horizontal.
Then go to Edit > Free Transform (Ctrl+T), hold down the Shift key, scale this layer down and move the water at the bottom of the tap to look like it’s coming out of it. Set the opacity of this layer to 90%, name it “water” and put it beneath the “tap” layer.
Step 58
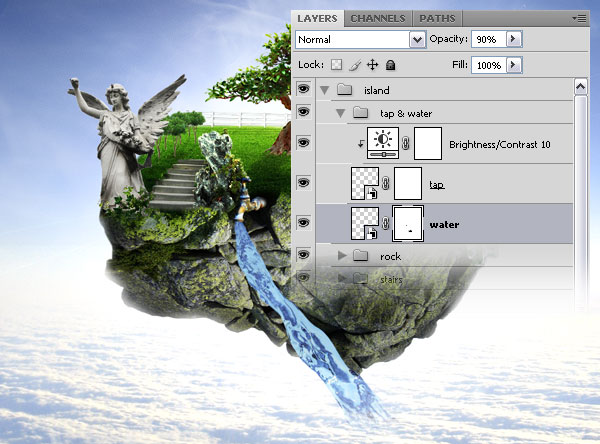
Add a mask to the “water” layer (Layer > Layer Mask > Reveal All), select a black soft brush and paint with it over the bottom area of the water. Then select a smaller brush and, if necessary, paint with it over the area where the water is coming out of the tap.
Step 59
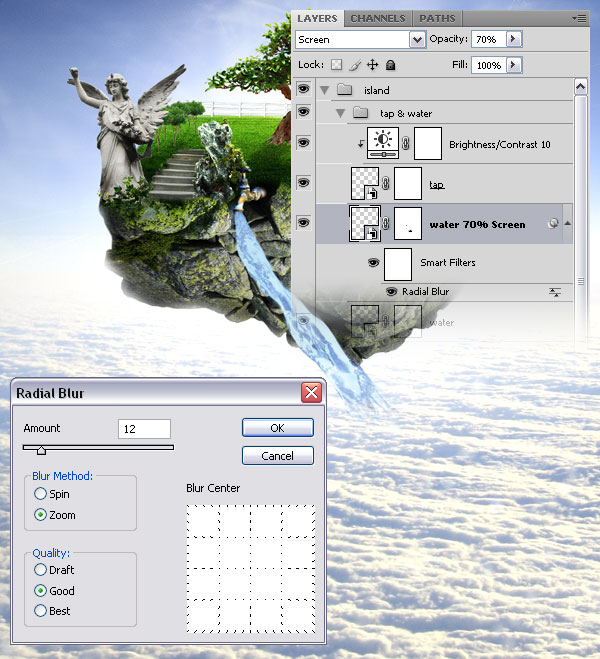
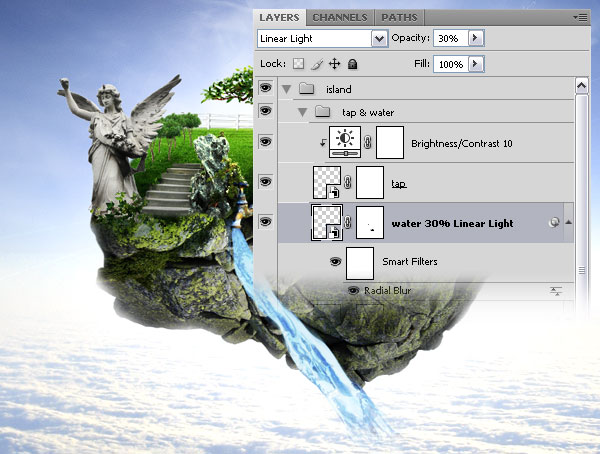
Duplicate the “water” layer by hitting Ctrl+J. Then go to Filter > Blur > Radial Blur and use the settings from the following image. Set the blend mode of this layer to Screen, the opacity to 70% and then name it “water 70% screen.”
Step 60
Duplicate the layer which you have created at the previous step by hitting Ctrl+J. Set the blend mode of this layer to Linear Light, the opacity to 30% and then name it “water 30% Linear Light.”
Step 61 – Adding pigeons
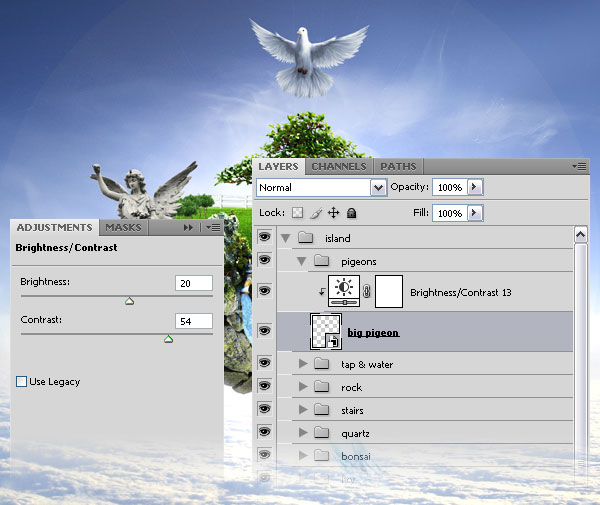
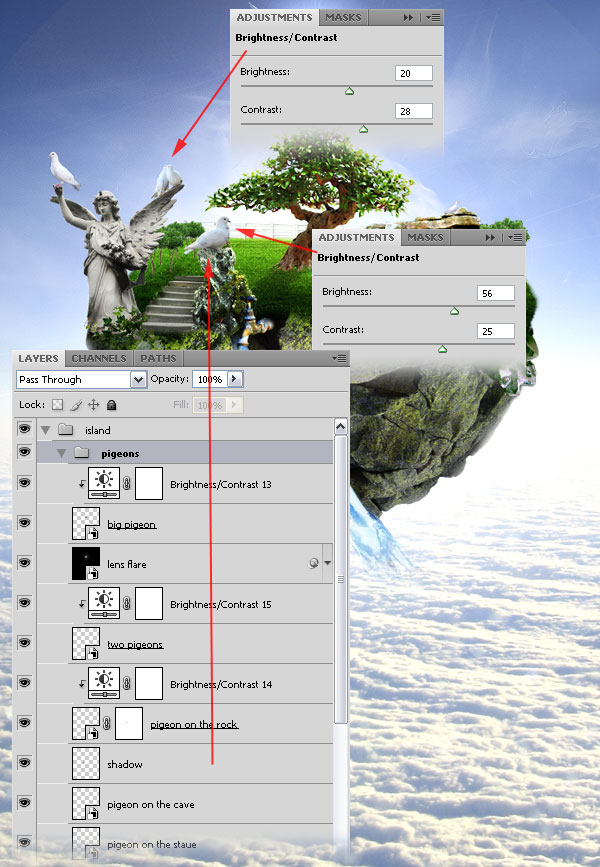
We can’t have a Heaven scene without pigeons, right? So, create a new group and name it “pigeons.” Then download this image, open it in Photoshop and use the Pen Tool (P) to cut out the bird. Move the pigeon into your document using the Move Tool. Right-click on this layer and select Convert to Smart Object. Go to Edit > Free Transform, hold down the Shift key and scale this layer down. Name this layer “big pigeon.”
Go to Layer > New Adjustment Layer > Brightness/Contrast, check the “Use Previous Layer to Create Clipping Mask” option and use the settings from the following image.
Step 62 – Adding a lens flare
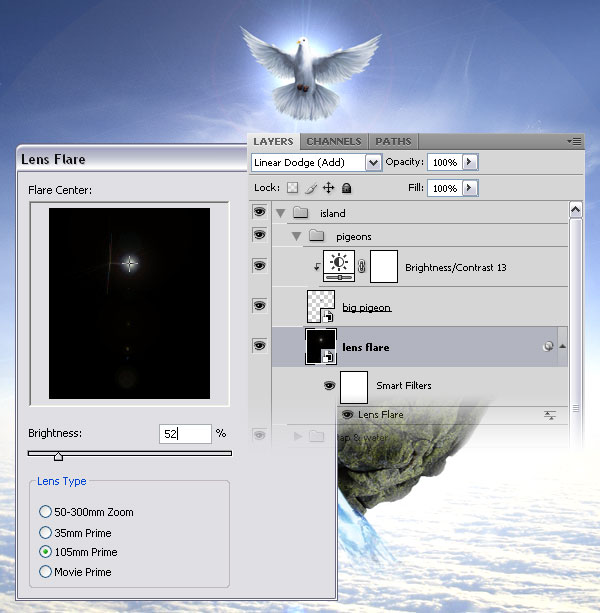
Create a new layer beneath the “big pigeon” layer and fill it with black. Right-click on this layer and select Convert to Smart Object. Then go to Filter > Render > Lens Flare and use the settings from the following image. Set the blend mode of this layer to Linear Dodge (Add) and name it “lens flare.”
Step 63 – Adding more pigeons
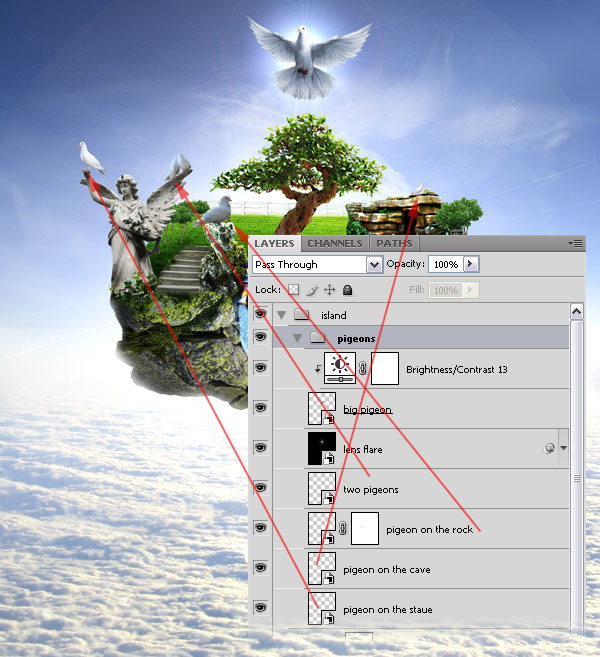
Here are some pigeons photos that you can use. Download these photos, open them in Photoshop and use the Pen Tool (P) to cut out all those pigeons. As usual, move each pigeon into your document using the Move Tool (V) and convert each layer into a smart object (right-click on the layer and select Convert to Smart Object). Then go to Edit > Free Transform, hold down the Shift key and scale each layer down. Use the Move Tool (V) to put each pigeon where you want, and then name all these layers.
You can use the same pigeon more times in your photo manipulation. Just duplicate a pigeon layer and go to Edit > Transform > Flip Horizontal. Then go to Edit > Free Transform (Ctrl+T), hold down the Shift key, scale the new layer down and move it in a different place. If you look closely to the following image you will see that the pigeon from the angel’s hand is the same pigeon from the cave.
Step 64
Use some Brightness/Contrast adjustment layers to add more light and contrast to the pigeons. Also, you can add a shadow to the pigeon sitting on the rock (or any other pigeon you want). To do this, create a new layer beneath that pigeon layer, select a black soft brush and paint with it over the rock. Then set the opacity of this layer to 40% and name it “shadow.”
Step 65 – Adding a divine light
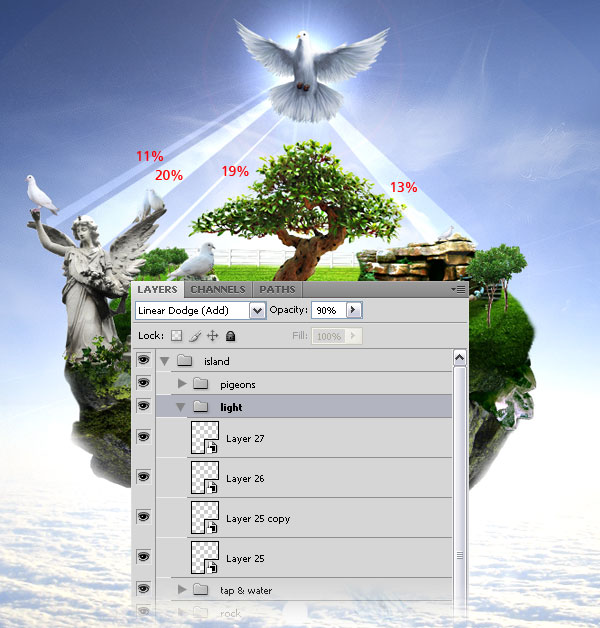
Create a new group beneath the “pigeons” group and name this one “light.” Set the blend mode of this group to Linear Dodge (Add) and the opacity to 90%. Then create a new layer inside this group and use the Polygonal Lasso Tool (L) to create a white shape like I did. Continue to create as many shapes as you want, each one in a new layer. Convert each layer into a smart object (right-click on the layer and select Convert to Smart Object) and set the opacity of each layer to 10-20%.
Step 66
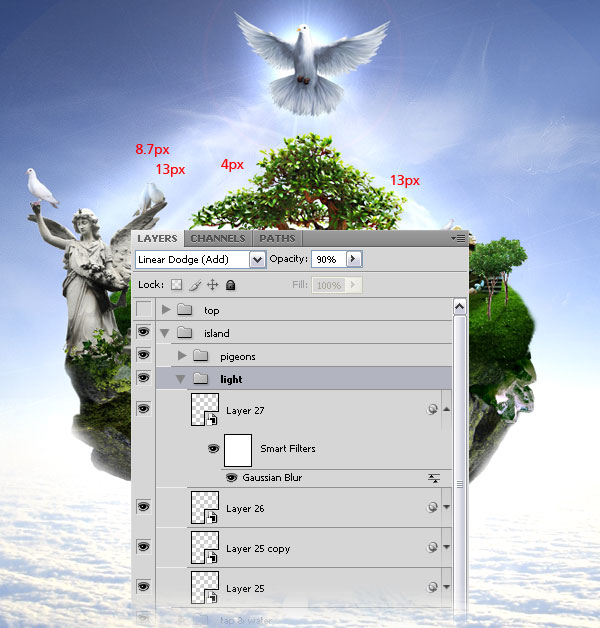
Add a Gaussian Blur filter (Filter > Blur > Gaussian Blur) to each of the layers inside the “light” group. Use different values for this filter.
Step 67 – Adding feathers
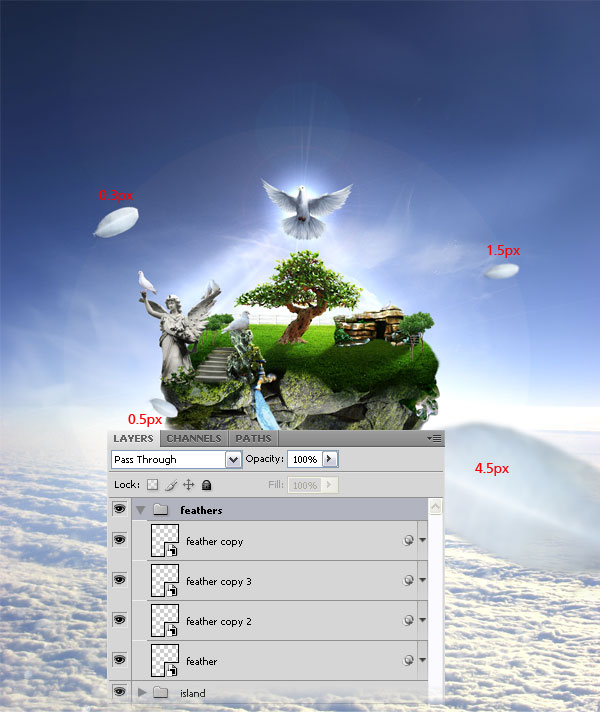
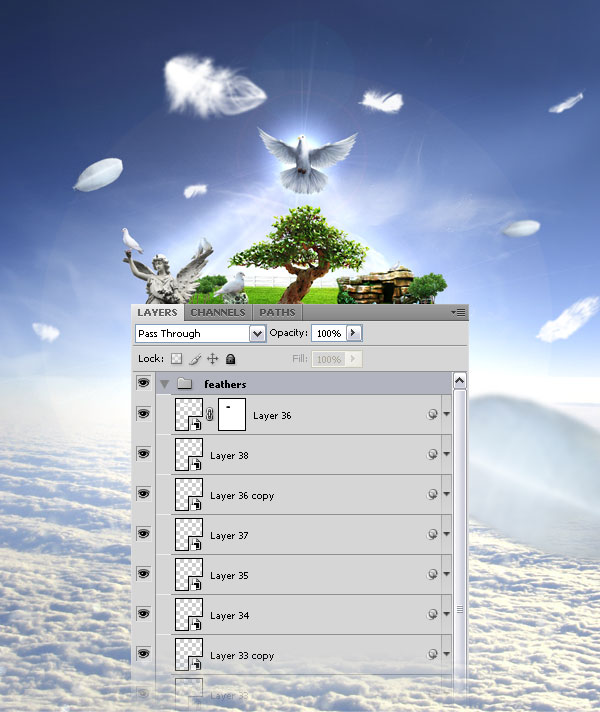
Now we are going to add some feathers around the island. Create a new group outside of the “island” group and name it “feathers.” The download this photo, open it in Photoshop and remove the black background. Move the feather into your document using the Move Tool (V), right-click on the layer, select Convert to Smart Object and then name it “feather.” Go to Edit > Free Transform, hold down the Shift key, scale this layer down and then rotate it.
Duplicate this layer a few times and change the size and the position of each feather. Then add a Gaussian Blur filter (Filter > Blur > Gaussian Blur) to each of these layers using different values.
Step 68
Download these brushes, install them, set the foreground color to white and use them to create more feathers. Use a new layer for each feather.
As usual, before going to Edit > Free Transform (Ctrl+T) to modify the feathers, convert each layer into a smart object. Then add a Gaussian Blur filter (Filter > Blur > Gaussian Blur) to each of these layers using different values.
Step 69 – Creating stars
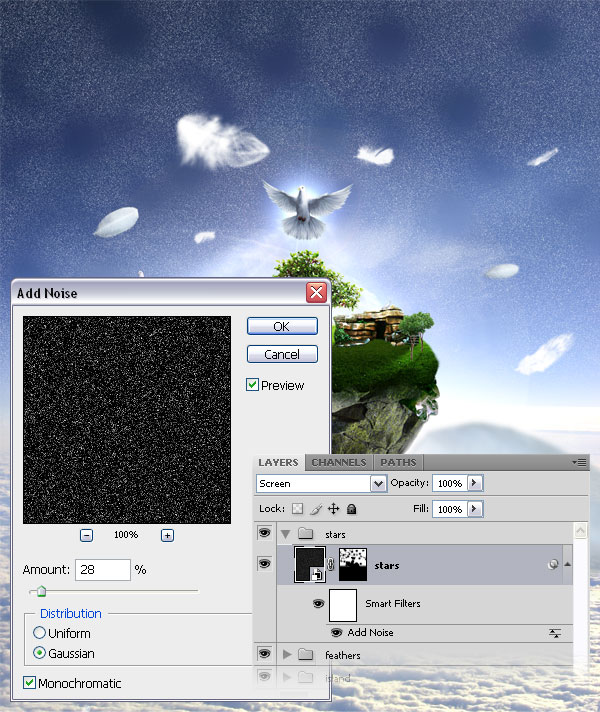
Create a new group and name it “stars.” Create a new layer inside this group and name this one “stars” too. Fill the “stars” layer with black, then right-click on this layer and select Convert to Smart Object. Go to Filter > Noise > Add Noise and use the settings from the following image.
Add a mask to the “stars” layer (Layer > Layer Mask > Reveal All), select a big black soft brush and paint with it over the clouds and the island. We don’t want stars above those areas. You can also use this brush to mask some areas of the stars from the sky. Then set the blend mode of the “stars” layer to Screen.
Step 70
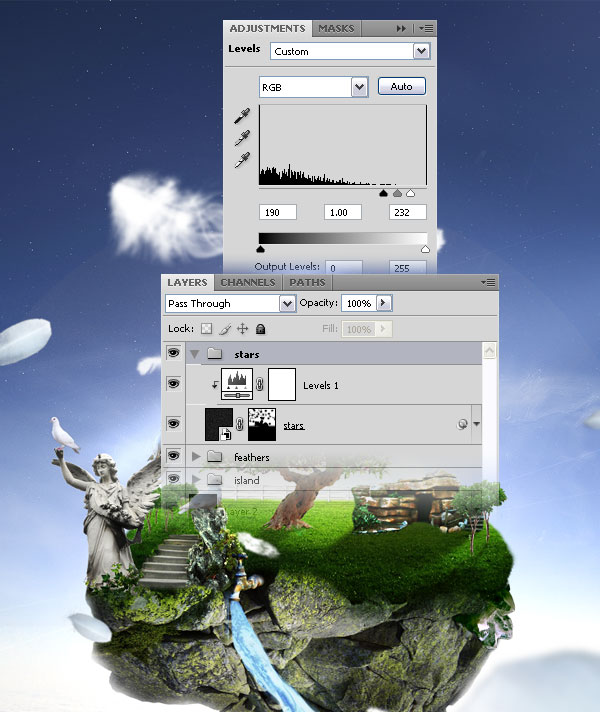
Now we are going to make the stars to look like some real stars. Go to Layer > New Adjustment Layer > Levels, check the “Use Previous Layer to Create Clipping Mask” option and use the settings from the following image.
Step 71 – Adding a subtle glow to the stars
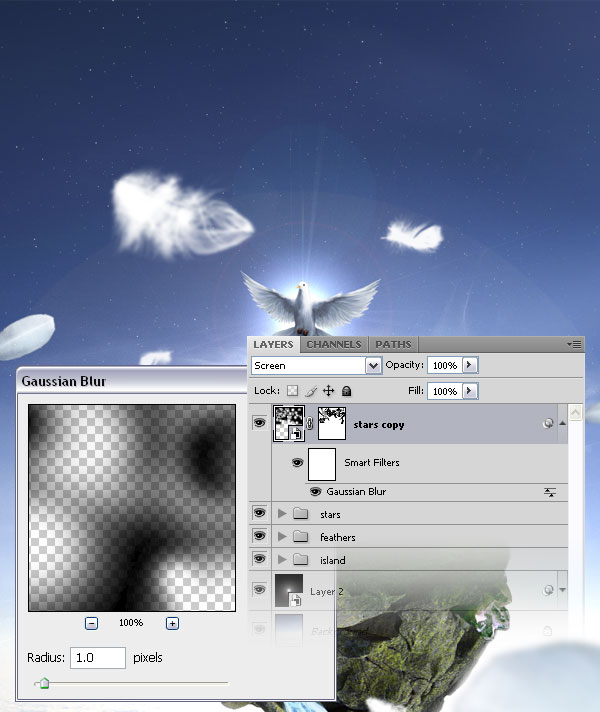
Duplicate the “stars” group (right-click on it and select Duplicate Group). Then right-click on the new group and select Convert to Smart Object. Set the blend mode of this layer to Screen, and then go to Filter > Blur > Gaussian Blur, use a value of 1px and click OK.
We don’t want all the stars to glow, so, add a mask to this layer (Layer > Layer Mask > Reveal All), select a black soft brush and paint with it over some areas of the stars.
Step 72 – Adding rays
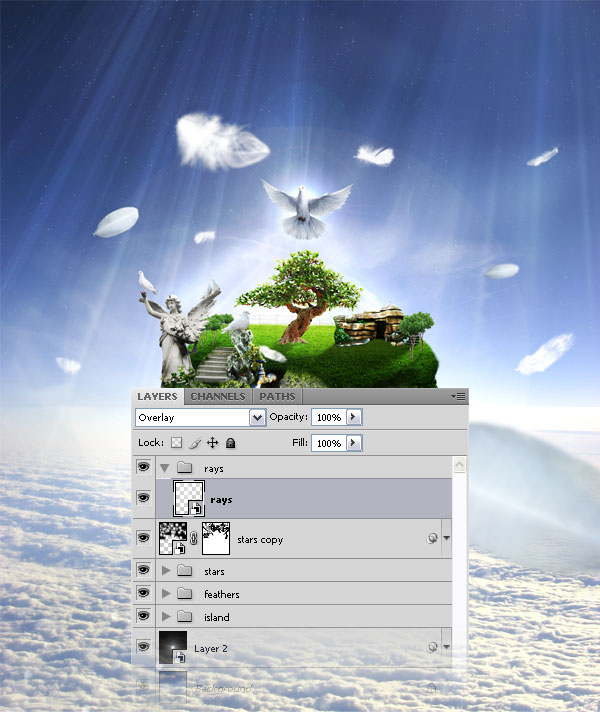
Create a new group and name it “rays.” Create a new layer inside this group and name it “rays” too. Then download these brushes, install them, set the foreground color to white and use those brushes to create rays. Right-click on this layer and select Convert to Smart Object. Then set the blend mode of this layer to Overlay.
Step 73
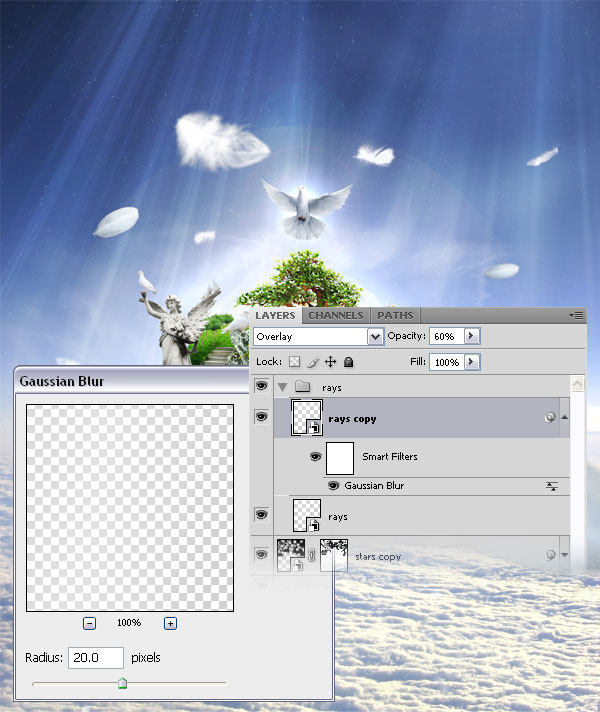
Duplicate the “rays” layer, go to Filter > Blur > Gaussian Blur and use a value of 20px. Then set the opacity of this layer to 60%.
Step 74 – Creating mist
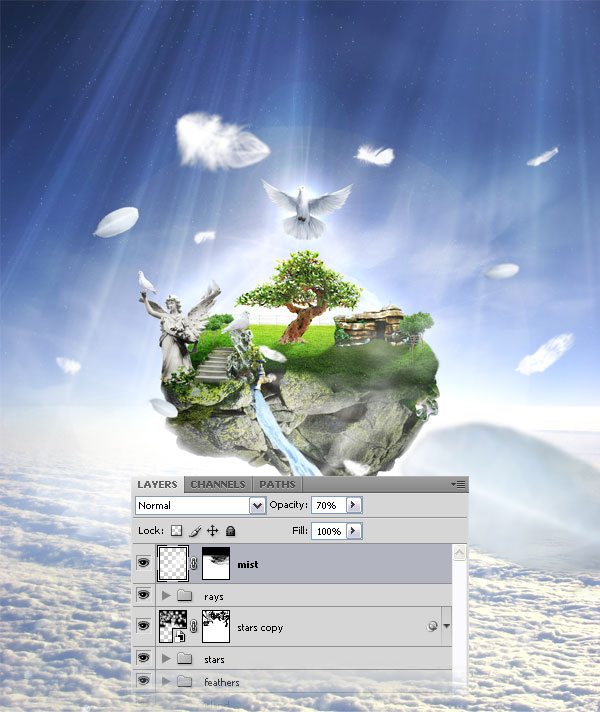
Create a new layer, set the foreground color to white and use the same brushes you used at the beginning of this tutorial (at the third step) to create mist. Set the opacity of this layer to 70% and name it “mist.” As you can see in the following image I have also used a mask. It’s up to you whether you want to use one or not.
Step 75 – Adding a quote
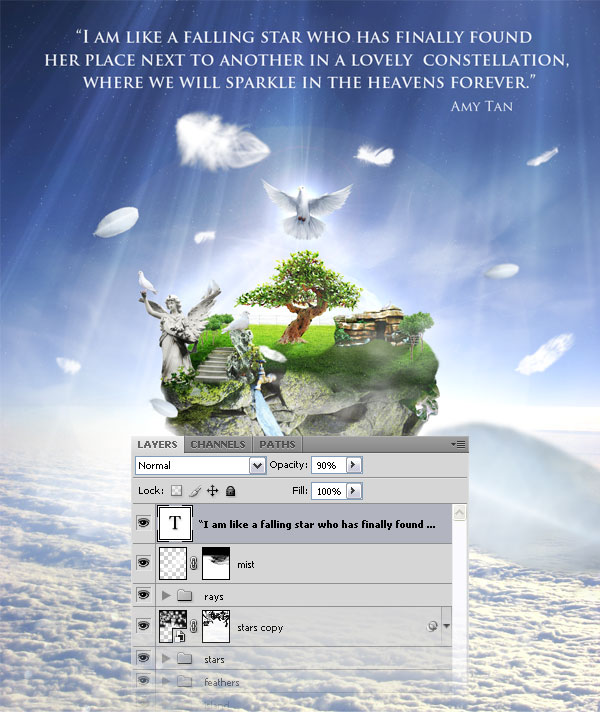
Select the Type Tool (T) and write a quote or anything else you want using a proper font (I used Trajan Pro). Set the opacity of this text layer to 90%.
Step 76 – Final color adjustments
Now we are going to use a technique to make the whole image more vivid. Create a new layer above all the other ones, go to Image > Apply Image and click OK. Then right-click on this layer and select Convert to Smart Object. Go to Filter > Blur > Guassian Blur and use the value 6.6px. Set the blend mode of this layer to Color and the opacity to 60%.
Duplicate this layer (Ctrl+J) and then set the blend mode of the duplicated layer to Screen and the opacity to10%.
Duplicate this layer one more time and set the blend mode of this new layer to Soft Light and the opacity to 55%.

Final Result & Conclusion
Well, here we have it. Our own piece of Heaven created in Photoshop. I hope that you enjoyed this tutorial as much as I had writing it. You can see the final result bellow. Also, you can check out the larger version here.
About the Author
Ionut Ciursa is a freelance designer based in Romania. Photoshop is one of his passions and he has been using this wonderful program for about four years. He loves to share his knowledge with others through his tutorials. He is also the founder of PSDBurn where he writes Photoshop tutorials.

