

Raster vs Vector: What’s the Difference and Does It Matter?
If you’re working in an Adobe program or any image creation/editing tool, then you’ve probably heard of raster vs vector images. If you’re not familiar with the differences between the two, then this is just the article for you!
Anyone who has to create a logo, tweak a photo, or make graphics needs to understand how raster and vector affect the final product.
For instance, whether you’re printing your image or publishing it online will make a big difference in which format works best.
So, what’s up with raster and vector images, and why does it still sound like Greek?
Keep reading to understand how the two different image types play out for graphic designers the world over.
Raster vs Vector: How are They Different?
Raster and vector files are both a type of image (or graphics), but they can have major differences in the end result. Let’s look at how each type affects the final design and how you can leverage each one:
What is a Raster Image?
Let’s start off from the beginning: whatever program you’re using, whatever software or hardware type, your screen or monitor displays images in pixels. They’re little squares (basically dots) of color that make up a picture or graphic.
When you create a digital image on a program, a raster image will be finalized or exported in a set dimension. The design is ultimately confined to the available pixels in the screen.
While that sounds limiting, raster images are actually capable of more detailed design. What’s more, raster images are especially useful when it comes to editing as each individual pixel can be altered.
Raster images are capable of more subtle blending and shading and use shadows and depth like a vector can’t. Soft gradients and bold, complex color patterns are easy to pull off when working on a pixel-by-pixel (or bit-by-bit) editing process.
Scaling with a Raster Image
Raster images, once finalized, can never be scaled up without compromising some of the image quality. When they are stretched, their shading and sharp edges become warped to fit the new dimensions.
This leaves the image blurry and unsatisfying. However, you can scale down a raster image and retain its good quality. The image only needs to dump unnecessary filler color and shading to become smaller, no blurriness involved.
The level of detail in a final raster image depends on its PPI (or its pixels per inch). This basically tells the computer how many bits or pixels to display within a given square inch. (Conversationally, you may hear it called dots-per-inch or DPI).
Once an image is finalized, it should remain the same dimension in the future to keep true to its pixel density. You’ll have to create variations to get larger or smaller images.
Browse stock photo websites like Website Automatic to get a better understanding of the different sizes and resolutions for raster images.
Standard PPI Dimensions and What They Mean
When you’re designing a raster image, there are a couple of standard PPI figures you’ll come across. Every Photoshop user should understand these two at least:
72 PPI
This used to be the standard or default PPI in a design project. Screen resolutions are a lot more advanced today, so don’t feel like you’re restricted to this setting. You’ll still be able to design with other PPI sizes and choose your own.
PPI mostly becomes important when you’re printing and the pixel density needs to be a set amount to look best.
300 PPI
The standard printing resolution, 300 PPI is the printing sweet spot. With anything lower than 300 pixels per square inch, the picture becomes blurry.
The human eye can’t detect much more than 300 PPI, so it caps out to a nice, even number.
What is a Vector Image?
In order to understand how vectors work, you’ll need to stretch your imagination a little. While raster images are arranged in pixels, vectors run off mathematical formulas. Instead of permanent pixels, vectors are a series of commands.
Sound confusing?
These vector formulas are paths that computer programs know to follow no matter the size of the image. Points, lines, and curves follow a path and aren’t restricted to pixels and bits. This allows for easy scaling without any loss of quality.
When you open a vector image in any program, the formulas will replicate the original image for you no matter the size. The only con here is that vector images have to rely on bold lines and solid colors, giving up a flexible design.
It restricts gradients and shading to a degree, so vector images aren’t the best for rich, complex pictures. They work especially well for logos and illustrations, though.
Filetypes and Exporting Options
Think back to the program you were using to design graphics: when you save and export, you’re more than likely presented with a list of options. Some provide easy editing in other programs while others simply look better in a type of media.
It all depends on the place each image will appear and the type of graphic being developed.
When working in Photoshop (or any other design program, really), you’ll notice an extensive list of export options. The filetype is ultimately determined by wherever the image will appear (whether print, online, in another design program, etc.).
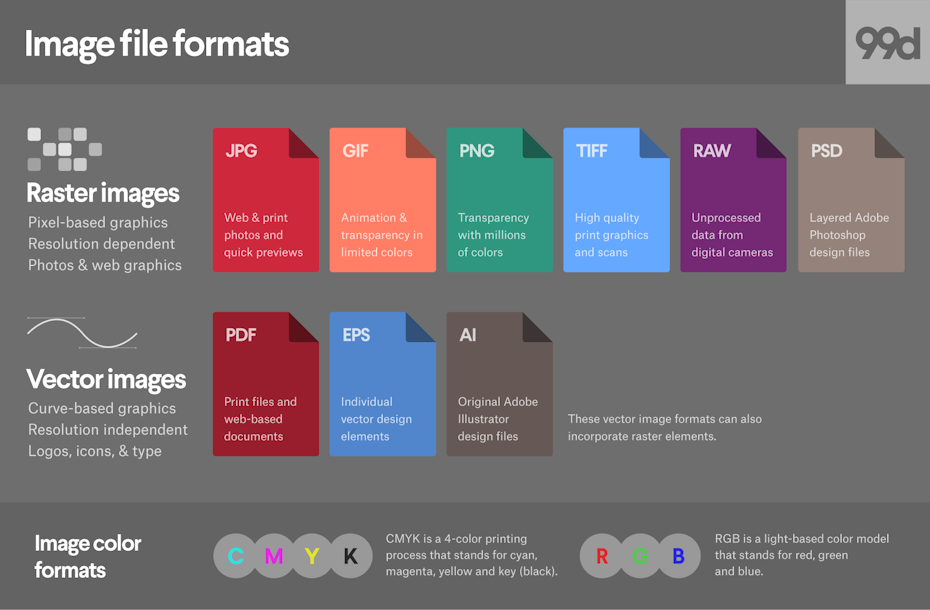
Raster
Raster images are often saved in GIF, JPG, PNG, and TIF formats (to name a few). They work especially well for printed brochures, website background images, social media posts, or any picture-quality design.
Vector
Vectors are often saved as AI and CDR files and are swapped around a lot in designing programs. Transparent backgrounds in these files allow vectors to appear on top of other images or designs (such as logos in navigational bars).
Both vectors and rasters can be rendered in PDF and EPS format, which makes for easy uploading and transferring.
More Photoshop Help from the Professionals
Understanding raster vs. vector will help you become a better designer, moving you towards more intricate and specialized designing. And when you’re ready to move on to the next level, check out the other tips and tricks from the Photoshop Lady!
The Photoshop Lady blog is regularly updated with insightful and helpful articles on designing professional, top-notch products.
Check out the Photoshop Lady blog today to learn more!