Plain text on a background is functional, but it is not going to stop anyone from scrolling. Realistic text effects turn flat letters into something that looks like it belongs in the physical world.
Foundation: Working with Type Layers
Choose a bold, thick font. Sans-serif fonts like Impact, Bebas Neue, or Montserrat Black give you enough surface area to see effects clearly. Set your text size large, at least 150 to 300 points on a 1920x1080 canvas.
Color the text white or light neutral to start.
Technique 1: Gold Metallic Text
Step 1: Create text on a dark background. Step 2: Open Layer Styles. Add Gradient Overlay alternating between dark gold (#A67C00), bright gold (#FFD700), and darker gold (#B8860B). Set angle to about 90 degrees. Step 3: Add Bevel and Emboss using "Inner Bevel" with "Chisel Hard" technique.
Depth around 300-400%, size 5-8 pixels. Step 4: Add Inner Shadow with dark brown color, low opacity. Step 5: Add Drop Shadow to lift the text off the background.
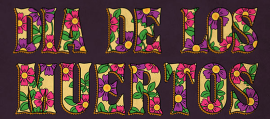
Technique 2: Stone or Concrete Text
Step 1: Type text, place a stone texture above it. Step 2: Create Clipping Mask so texture only shows inside the text.
Step 3: Add Bevel and Emboss with "Smooth" technique, depth around 200%, size about 10 pixels. Step 4: Add a subtle Inner Shadow. Step 5: Add a Drop Shadow. For extra realism, duplicate the texture layer, desaturate it, and set to "Overlay" at low opacity.
Technique 3: Neon Glow Text
Step 1: Dark background, thin or script font.
Step 2: Set text fill to 0% opacity (layer styles remain visible). Step 3: Outer Glow with bright saturated color, "Screen" blend mode, size 30-50px. Step 4: Inner Glow, same color but brighter, size about 10px. Step 5: Stroke of 2-3 pixels. Step 6: Drop Shadow using the neon color (not black), "Screen" blend mode.
Step 7: Paint a subtle glow on the wall behind using a soft brush at low opacity.
Technique 4: Embossed Leather or Paper
Step 1: Leather or paper texture as background. Text with fill at 0%. Step 2: Add "Pillow Emboss" style with "Smooth" technique, direction "Down" for debossed look. Keep depth moderate and size small (3-5px). Step 3: Subtle Inner Shadow matching the material color. The key is subtlety. Real embossing is a gentle impression.
Technique 5: Fire or Lava Text
Step 1: Bold text on black background. Rasterize the text layer. Step 2: Filter > Stylize > Wind. Apply multiple times and rotate canvas to create upward streaks. Step 3: Apply Gaussian Blur at 2-3 pixels. Step 4: Hue/Saturation, colorize to orange (hue ~40). Step 5: Duplicate layer, shift hue to red, set to "Screen" blend mode. Step 6: Use Liquify filter to warp streaks into organic, flickering shapes.
General Tips
Save layer styles as presets for one-click reuse. Use Smart Objects for non-destructive editing. Match lighting direction between effects and background. Less is usually more. Subtle, well-balanced effects look professional. Start with low values and increase gradually.
Once you understand how Bevel and Emboss, Gradient Overlay, Outer Glow, and Drop Shadow interact, you can create virtually any material or lighting effect on type without needing plugins.